Working With Virtual Environments
Much of the difficulty in programming comes in the management of the environment. Differences in configuration, dependencies, and runtime can introduce problems and bugs that are very difficult to troubleshoot and fix. Because of this, tools that help to isolate and standardize configuration and dependencies can be amongst the most useful in the developer's toolbox.
In the Python ecosystem, these isolated (or sandboxed) environments are called "virtual environments." In this post, we'll introduce two tools that can be used to create and manage virtual environments: virtualenv and virtualenvwrapper.
virtualenv
virtualenv is a tool used to isolate Python projects and the associated packages. virtualenv works by creating a folder which holds all the necessary dependencies, packages, and executable programs. When the environment is "activated," the path variable of the system is adjusted so that packages and executables in the environment take precedence over other tools installed on the system.
Working with virtualenv
It is generally considered best practice to use virtual environments whenever working on any Python based project. Because of this it is common to practice to create the environment as part of the initial checkout of the sources and configuration.
A common workflow using virtualenv might be similar to the following:
- Using a terminal, create the project root directory.
- From inside the project directory, create an environment using "virtualenv env"
- Activate the environment and install dependencies
# Create the project directory
$ mkdir myproject

# Go into the project's folder
$ cd myproject

# Create a virtualenv named "env"
$ virtualenv env

# Activate the environment using source
$ source env/bin/activate

# Install project dependencies using a requirements file
$ pip install -r requirements.txt
virtualenv Layout and Structure
virtual environments are created using the virtualenv command. By default, the command takes a single argument: the path to where the environment should be created. Additional options allow for many aspects of the environment to be configured, including the version of Python and whether packages installed on the system should be linked into the environment.
# Create a new virtual environment using Python 3
$ virtualenv --python=python3 path/to/env
There are several conventions as to where to place environments, but one common approach is to put it alongside the source folder for a program. For example, a project might be checkout out to ~/myproject/project-src. If following the convention, the environment would be placed at ~/myproject/env.
It is also common to name the environment "env" so the every project environment is configured in similar fashion.
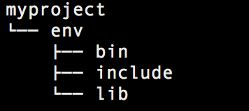
Environments are collections of folders which mimic a Unix filesystem:
- bin is where Python and other environment executables are located
- lib is where Python packages will be installed
Activating the virtual environment
Virtual environments are turned on by "activating" them via an activate script. The script is located in the bin folder.
To see how the activate script modifies the environment, consider the procedure below:
- Run "which python", which will tell you what the currently active version of Pyhton is.
- From the root of some project, run with an environment, run: "source env/bin/activate"
- Use which a second time to check the active version of Python
# Virtual Environments use paths to provide preference
# for executables inside of an environment over system
# installed programs. The routine below shows how
# Python is re-mapped
$ which python

# Output:
/usr/bin/python

# Activate a virtual environment
$ cd ~/myproject
$ source ~/myproject/env/bin/activate

# Check the active version of Python
(env)$ which python

# Output
/home/myuser/myproject/bin/python
When an environment is active, the environment's name (env) will display before the command prompt.
virtualenvwrapper
virtualenvwrapper is a set of extensions to the virtualenv tool. The extensions include wrappers for creating and deleting virtual environment, managing your development workflow, and providing hooks to setup or tear down parts of the environment on entry or exit.
As an example of what the package provides, consider the process of activating an environment:
- With virtualenv to activate an environment you have to run:
- $ source ~/myproject/env/bin/activate
- With virtualenvwrapper, this is simplifed to:
- $ workon myproject
virtualenv Quickstart
In this section, we will provide a brief walkthrough so that you can get up and running with virtualenv and virtualenvwrapper. This tutorial is aimed for users of Ubuntu Linux. You will:
- Install both virtualenv and virtualenvwrapper to your machine.
- Initialize virtualenvwrapper to your console.
- Create virtual environments using the extension commands.
- Install packages into your new virtualenv.
1. Install virtualenv
To begin, start by installing the package manager, "pip". If you already have pip installed, skip to step "#4" in the code output below.
#1 update package list
$ sudo apt-get update

#2 Install pip for Python
$ sudo apt-get install python-pip

#3 Verify the installation by checking the pip version:
$ pip --version

#4 Install virtualenv
$ sudo pip install virtualenv

#5 Create a dir to store your virtualenvs
$ mkdir ~/.virtualenvs
2. Install virtualenvwrapper
virtuaenvwrapper can be installed from the Ubuntu system packages or using pip. Here, we install it using pip install virtualenvwrapper.
Once available, additional steps are required before the command extensions are available. These include:
- Configuring environment variables
- Ensuring that the script is sourced at startup in order to create command aliases
#1 Install virtualenvwrapper using pip
$ sudo pip install virtualenvwrapper

#2 Set WORKON_HOME to your virtualenv directory.
# WORKON_HOME is the directory in which environments
# will be created by default (if using the mkvirtualenv)
# command provided by virtualenvwrapper
$ export WORKON_HOME=~/.virtualenvs
A convenient way to initialize virtualenvwrapper is to add the configuration to your user's ~/.bashrc file.
#1 Open ~/.bashrc with your text editor.
$ vi ~/.bashrc

#2 At the end of the file, add the following line:
source /usr/local/bin/virtualenvwrapper.sh

#3 Save and close the file.
Exit and re-open your shell to reload the console with virtualenvwrapper's commands.
3. Create a new virtualenv
You can create virtual environments using the command: mkvirtualenv
To exit your virtualenv, use the command: deactivate
#1 Create a virtualenv named project1
$ mkvirtualenv project1

#2 Deactivate the current environment
(project1)$ deactivate

#3 Create a second virtualenv named env1
$ mkvirtualenv env1
4. Switching Environments
To list all available environments, run the command:
ls $WORKON_HOME
or simply type:
workon
To activate an environment, run the command:
workon <environment-name>
#1 List all virtual environments
$ ls $WORKON_HOME
#Output:
project1
env1

#2 Activate environment 'project1'
$ workon project1
5. Managing Dependencies within an environment
With an environment active, you can install packages and dependencies. The packages will automatically be placed within the environments lib/site-packages folder.
To view a list of all packages within an environment, use the command: lssitepackages
#1 Activate the project1 environment
$ workon project1

#2 Install the package 'django' into this environment
(project1)$ pip install django
...
Succesfully installed django

#3 View the environment's packages:
(project1)$ lssitepackages
Django-version
setuptools-version
pip
django
...

#4 Switch to the 'env1' environment
(project1)$ workon env1

#5 View the environment's packages
(env1)$ lssitepackages
setuptools-version
pip
Notice how the software Django isn't included in (env1)'s packages, this is because we installed the software on the (project1) virtualenv. The dependencies of the one environment are only visible when that environment is active. In this way, each project can have the dependencies managed separately helping to prevent conflicts or issues.
Comments
Loading
No results found