Spark on Kubernetes: First Steps
When it was released, Apache Spark 2.3 introduced native support for running on top of Kubernetes. Spark 2.4 extended this and brought better integration with the Spark shell. In this blog post, we'll look at how to get up and running with Spark on top of a Kubernetes cluster.
This article is Part 1 of a larger series on how to run important Data Science tools in Kubernetes.
Prerequisites
To utilize Spark with Kubernetes, you will need:
- A Kubernetes cluster that has role-based access controls (RBAC) and DNS services enabled
- Sufficient cluster resources to be able to run a Spark session (at a practical level, this means at least three nodes with two CPUs and eight gigabytes of free memory)
- A properly configured
kubectlthat can be used to interface with the Kubernetes API - Authority as a cluster administrator
- Access to a public Docker repository or your cluster configured so that it is able to pull images from a private repository
- Basic understanding of Apache Spark and its architecture
In this post, we are going to focus on directly connecting Spark to Kubernetes without making use of the Spark Kubernetes operator. The Kubernetes operator simplifies several of the manual steps and allows the use of custom resource definitions to manage Spark deployments.
Overview
In this article, we will:
- Create a Docker container containing a Spark application that can be deployed on top of Kubernetes
- Integrate Spark with
kubectlso that is able to start and monitor the status of running jobs - Demonstrate how to launch Spark applications using
spark-submit - Start the Spark Shell and demonstrate how interactive sessions interact with the Kubernetes cluster
Spark Essentials
Spark is a general cluster technology designed for distributed computation. While primarily used for analytic and data processing purposes, its model is flexible enough to handle distributed operations in a fault tolerant manner. It is a framework that can be used to build powerful data applications.
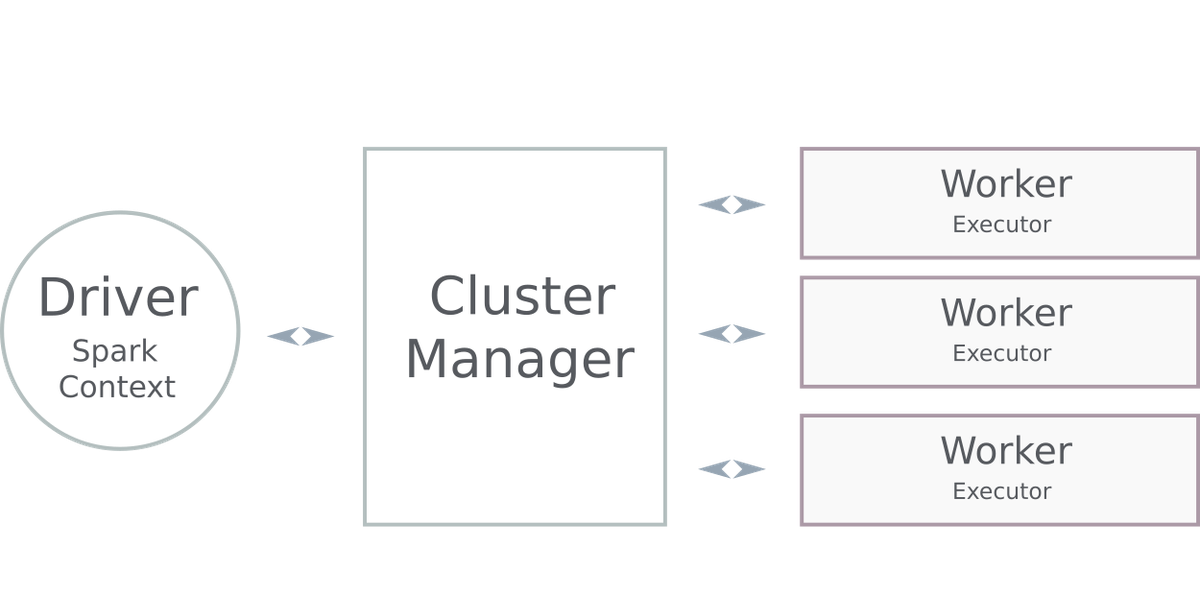
Every Spark application consists of three building blocks:
- The Driver boots and controls all processes. The driver serves as the master node in a Spark application or interactive session. It manages the job of splitting data operations into tasks and then scheduling them to run on executors (which themselves run on nodes of the cluster).
- The Cluster Manager helps the driver schedule work across nodes in the cluster using executors. Spark supports several different types of executors. The most common is Hadoop, but Mesos and Kubernetes are both available as options.
- The Workers run executors. Executors are distributed across the cluster and do the heavy lifting of a Spark program -data aggregation, machine learning training, and other miscellaneous number crunching. Except when running in "local" mode, executors run on some kind of a cluster to leverage a distributed environment with plenty of resources. They typically are created when a Spark application begins and often run for the entire lifetime of the Spark application. This pattern is called static allocation, and it is also possible to have dynamic allocation of executors which means that they will be initialized when data actually needs to be processed.
In a traditional Spark application, a driver can either run inside or outside of a cluster. Depending on where it executes, it will be described as running in "client mode" or "cluster mode."
Networking Considerations: Executor-Driver Communication in Kubernetes
When Spark deploys an application inside of a Kubernetes cluster, Kubernetes doesn't handle the job of scheduling executor workload. Rather, its job is to spawn a small army of executors (as instructed by the cluster manager) so that workers are available to handle tasks. The driver then coordinates what tasks should be executed and which executor should take it on. Once work is assigned, executors execute the task and report the results of the operation back to the driver.
This last piece is important. Since a cluster can conceivably have hundreds or even thousands of executors running, the driver doesn't actively track them and request a status. Instead, the executors themselves establish a direct network connection and report back the results of their work. In complex environments, firewalls and other network management layers can block these connections from the executor back to the master. If this happens, the job fails.
This means that we need to take a degree of care when deploying applications. Kubernetes pods are often not able to actively connect to the launch environment (where the driver is running). If the job was started from within Kubernetes or is running in "cluster" mode, it's usually not a problem. All networking connections are from within the cluster, and the pods can directly see one another.
In client mode (which is how most Spark shells run), this is a problem. The executor instances usually cannot see the driver which started them, and thus they are not able to communicate back their results and status. This means interactive operations will fail.
Based on these requirements, the easiest way to ensure that your applications will work as expected is to package your driver or program as a pod and run that from within the cluster. In this post, we'll show how you can do that. First, we'll look at how to package Spark driver components in a pod and use that to submit work into the cluster using the "cluster mode." Then we'll show how a similar approach can be used to submit client mode applications, and the additional configuration required to make them work.
The ability to launch client mode applications is important because that is how most interactive Spark applications run, such as the PySpark shell.
Proof of Concept
Any relatively complex technical project usually starts with a proof of concept to show that the goals are feasible. Spark on top of Kubernetes has a lot of moving parts, so it's best to start small and get more complicated after we have ensured that lower-level pieces work. To that end, in this post we will use a minimalist set of containers with the basic Spark runtime and toolset to ensure that we can get all of the parts and pieces configured in our cluster. Specifically, we will:
- Build the containers for the driver and executors using a multi-stage Dockerfile. We use a multi-stage Docker container to show how the entire build process can be automated. The Dockerfile can be modified later to inject additional components specific to the types of analysis, or other tools you might need.
- Create a service account and configure the authentication parameters required by Spark to connect to the Kubernetes control plane and launch workers.
- Start the containers and submit a sample job (calculating Pi) to test the setup.
Copies of the build files and configurations used throughout the article are available from the Oak-Tree DataOps Examples repository.
Building Containers
Pods are container runtimes which are instantiated from container images, and will provide the environment in which all of the Spark workloads run. While there are several container runtimes, the most popular is Docker. In this section, we'll create a set of container images that provide the fundamental tools and libraries needed by our environment.
In Docker, container images are built from a set of instructions collectively called a Dockerfile. Each line of a Dockerfile has an instruction and a value. Instructions are things like "run a command", "add an environment variable", "expose a port", and so-forth.
Base Image
The code listing shows a multi-stage Dockerfile which will build our base Spark environment. This will be used for running executors and as the foundation for the driver. In the first stage of the build we download the Apache Spark runtime (version 2.4.4) to a temporary directory, extract it, and then copy the runtime components for Spark to a new container image. Using a multi-stage process allows us to automate the entire container build using the packages from the Apache Spark downloads page.
In the second step, we configure the Spark container, set environment variables, patch a set of dependencies to avoid errors, and specify a non-root user which will be used to run Spark when the container starts.
# Dependencies Container Image
# Install wget to retrieve Spark runtime components,
# extract to temporary directory, copy to the desired image
FROM ubuntu:18.04 AS deps

RUN apt-get update && apt-get -y install wget
WORKDIR /tmp
RUN wget http://mirrors.gigenet.com/apache/spark/spark-2.4.4/spark-2.4.4-bin-hadoop2.7.tgz \
	&& tar xvzf spark-2.4.4-bin-hadoop2.7.tgz


# Runtime Container Image. Adapted from the official Spark runtime
# image from the project repository at https://github.com/apache/spark.
FROM openjdk:8-jdk-slim AS build

# Spark UID
ARG spark_uid=185

# Install Spark Dependencies and Prepare Spark Runtime Environment
RUN set -ex && \
    apt-get update && \
    ln -s /lib /lib64 && \
    apt install -y bash tini libc6 libpam-modules libnss3 wget python3 python3-pip && \
    mkdir -p /opt/spark && \
    mkdir -p /opt/spark/examples && \
    mkdir -p /opt/spark/work-dir && \
    touch /opt/spark/RELEASE && \
    rm /bin/sh && \
    ln -sv /bin/bash /bin/sh && \
    ln -sv /usr/bin/tini /sbin/tini && \
    echo "auth required pam_wheel.so use_uid" >> /etc/pam.d/su && \
    chgrp root /etc/passwd && chmod ug+rw /etc/passwd && \
    ln -sv /usr/bin/python3 /usr/bin/python && \
    ln -sv /usr/bin/pip3 /usr/bin/pip \
    rm -rf /var/cache/apt/*

# Install Kerberos Client and Auth Components
ENV DEBIAN_FRONTEND=noninteractive
RUN apt-get update \
  && apt install -yqq krb5-user \
  && rm -rf /var/cache/apt/*


# Copy previously fetched runtime components
COPY --from=deps /tmp/spark-2.4.4-bin-hadoop2.7/bin /opt/spark/bin
COPY --from=deps /tmp/spark-2.4.4-bin-hadoop2.7/jars /opt/spark/jars
COPY --from=deps /tmp/spark-2.4.4-bin-hadoop2.7/python /opt/spark/python
COPY --from=deps /tmp/spark-2.4.4-bin-hadoop2.7/R /opt/spark/R
COPY --from=deps /tmp/spark-2.4.4-bin-hadoop2.7/sbin /opt/spark/sbin
COPY --from=deps /tmp/spark-2.4.4-bin-hadoop2.7/yarn /opt/spark/yarn

# Copy Docker entry script
COPY --from=deps /tmp/spark-2.4.4-bin-hadoop2.7/kubernetes/dockerfiles/spark/entrypoint.sh /opt/

# COpy examples, data, and tests
COPY --from=deps /tmp/spark-2.4.4-bin-hadoop2.7/examples /opt/spark/examples
COPY --from=deps /tmp/spark-2.4.4-bin-hadoop2.7/data /opt/spark/data
COPY --from=deps /tmp/spark-2.4.4-bin-hadoop2.7/kubernetes/tests /opt/spark/tests

# Replace out of date dependencies causing a 403 error on job launch
WORKDIR /tmp
RUN cd /tmp \
  && wget https://oak-tree.tech/documents/59/kubernetes-client-4.6.4.jar \
  && wget https://oak-tree.tech/documents/58/kubernetes-model-4.6.4.jar \
  && wget https://oak-tree.tech/documents/57/kubernetes-model-common-4.6.4.jar \
  && rm -rf /opt/spark/jars/kubernetes-client-* \
  && rm -rf /opt/spark/jars/kubernetes-model-* \
  && rm -rf /opt/spark/jars/kubernetes-model-common-* \
  && mv /tmp/kubernetes-* /opt/spark/jars/


# Set Spark runtime options
ENV SPARK_HOME /opt/spark

WORKDIR /opt/spark/work-dir
RUN chmod g+w /opt/spark/work-dir

ENTRYPOINT [ "/opt/entrypoint.sh" ]

# Specify the User that the actual main process will run as
USER ${spark_uid}
Using the Docker image, we can build and tag the image. When it finishes, we need to push it to an external repository for it to be available for our Kubernetes cluster. The command in the listing shows how this might be done.
Below, we use a public Docker registry at code.oak-tree.tech:5005 The image needs to be hosted somewhere accessible in order for Kubernetes to be able to use it. While it is possible to pull from a private registry, this involves additional steps and is not covered in this article.
# Build and tag the base/executor image
docker build -f Dockerfile.executor \
    -t code.oak-tree.tech:5005/courseware/oak-tree/dataops-examples/spark-k8s-base .

# Push the contaimer image to a public registry
docker push code.oak-tree.tech:5005/courseware/oak-tree/dataops-examples/spark-k8s-base
Driver Image
For the driver, we need a small set of additional resources that are not required by the executor/base image, including a copy of Kube Control that will be used by Spark to manage workers. The container is the same as the executor image in most other ways and because of that we use the executor image as the base.
FROM code.oak-tree.tech:5005/courseware/oak-tree/dataops-examples/spark-k8s-base

# Install kubectl
USER root
RUN apt install -y apt-transport-https apt-utils gnupg curl \
  && curl -s https://packages.cloud.google.com/apt/doc/apt-key.gpg | apt-key add - \
  && echo "deb https://apt.kubernetes.io/ kubernetes-xenial main" | tee -a /etc/apt/sources.list.d/kubernetes.list \
  && apt update \
  && apt install -y kubectl

# Switch back to Spark USER uid
USER ${spark_uid}
As with the executor image, we need to build and tag the image, and then push to the registry.
# Build and tag the driver image
docker build -f Dockerfile.driver \
    -t code.oak-tree.tech:5005/courseware/oak-tree/dataops-examples/spark-k8s-driver .

# Push the contaimer image to a public registry
docker push code.oak-tree.tech:5005/courseware/oak-tree/dataops-examples/spark-k8s-driver
Service Accounts and Authentication
For the driver pod to be able to connect to and manage the cluster, it needs two important pieces of data for authentication and authorization:
- The CA certificate, which is used to connect to the
kubeletcontrol daemon - The auth (or bearer) token, which identifies a user and the scope of its permissions
There are a variety of strategies which might be used to make this information available to the pod, such as creating a secret with the values and mounting the secret as a read-only volume. A Kubernetes secret lets you store and manage sensitive information such as passwords. An easier approach, however, is to use a service account that has been authorized to work as a cluster admin. One of the cool things that Kubernetes does when running a pod under a service account is to create a volumeSource (basically a read-only mount) with details about the user context in which a pod is running.
Inside of the mount will be two files that provide the authentication details needed by kubectl:
/var/run/secrets/kubernetes.io/serviceaccount/ca.crt: CA certificate/var/run/secrets/kubernetes.io/serviceaccount/token: Kubernetes authentication token
Driver Service Account
The set of commands below will create a special service account (spark-driver) that can be used by the driver pods. It is configured to provide full administrative access to the namespace.
# Create spark-driver service account
kubectl create serviceaccount spark-driver

# Create a cluster and namespace "role-binding" to grant the account administrative privileges
kubectl create rolebinding spark-driver-rb --clusterrole=cluster-admin --serviceaccount=default:spark-driver
Executor Service Account
While it is possible to have the executor reuse the spark-driver account, it's better to use a separate user account for workers. This allows for finer-grained tuning of the permissions. The worker account uses the "edit" permission, which allows for read/write access to most resources in a namespace but prevents it from modifying important details of the namespace itself.
# Create Spark executor account
kubectl create serviceaccount spark-minion

# Create rolebinding to offer "edit" privileges
kubectl create rolebinding spark-minion-rb --clusterrole=edit --serviceaccount=default:spark-minion
Running a Test Job
With the images created and service accounts configured, we can run a test of the cluster using an instance of the spark-k8s-driver image. The command below will create a pod instance from which we can launch Spark jobs.
Creating a pod to deploy cluster and client mode Spark applications is sometimes referred to as deploying a "jump", "edge" , or "bastian" pod. It's variant of deploying a Bastion Host, where high-value or sensitive resources run in one environment and the bastion serves as a proxy.
# Create a jump pod using the Spark driver container and service account
kubectl run spark-test-pod --generator=run-pod/v1 -it --rm=true \
  --image=code.oak-tree.tech:5005/courseware/oak-tree/dataops-examples/spark-k8s-driver \
  --serviceaccount=spark-driver \
  --command -- /bin/bash
The kubectl command creates a deployment and driver pod, and will drop into a BASH shell when the pod becomes available. The remainder of the commands in this section will use this shell.
Apache's Spark distribution contains an example program that can be used to calculate Pi. Since it works without any input, it is useful for running tests. We can check that everything is configured correctly by submitting this application to the cluster. Spark commands are submitted using spark-submit. In the container images created above, spark-submit can be found in the /opt/spark/bin folder.
spark-submit commands can become quite complicated. For that reason, let's configure a set of environment variables with important runtime parameters. While we define these manually here, in applications they can be injected from a ConfigMap or as part of the pod/deployment manifest.
# Define environment variables with accounts and auth parameters
export SPARK_NAMESPACE=default
export SA=spark-minion
export K8S_CACERT=/var/run/secrets/kubernetes.io/serviceaccount/ca.crt
export K8S_TOKEN=/var/run/secrets/kubernetes.io/serviceaccount/token

# Docker runtime image
export DOCKER_IMAGE=code.oak-tree.tech:5005/courseware/oak-tree/dataops-examples/spark-k8s-base
export SPARK_DRIVER_NAME=spark-test1-pi
The command below submits the job to the cluster. It will deploy in "cluster" mode and references the spark-examples JAR from the container image. We tell Spark which program within the JAR to execute by defining a --class option. In this case, we wish to run org.apache.spark.examples.SparkPi.
# spark-submit command
/opt/spark/bin/spark-submit --name sparkpi-test1 \
   --master k8s://https://kubernetes.default:443 \
  --deploy-mode cluster  \
  --class org.apache.spark.examples.SparkPi  \
  --conf spark.kubernetes.driver.pod.name=$SPARK_DRIVER_NAME  \
  --conf spark.kubernetes.authenticate.subdmission.caCertFile=$K8S_CACERT  \
  --conf spark.kubernetes.authenticate.submission.oauthTokenFile=$K8S_TOKEN  \
  --conf spark.kubernetes.authenticate.driver.serviceAccountName=$SA  \
  --conf spark.kubernetes.namespace=$SPARK_NAMESPACE  \
  --conf spark.executor.instances=2  \
  --conf spark.kubernetes.container.image=$DOCKER_IMAGE  \
  --conf spark.kubernetes.container.image.pullPolicy=Always \
  local:///opt/spark/examples/jars/spark-examples_2.11-2.4.4.jar 1000
The Kubernetes control API is available within the cluster within the default namespace and should be used as the Spark master. If Kubernetes DNS is available, it can be accessed using a namespace URL (https://kubernetes.default:443 in the example above). Note the k8s://https:// form of the URL. as this is not a typo. The k8s:// prefix is how Spark knows the provider type.
The local:// path of the jar above references the file in the executor Docker image, not on jump pod that we used to submit the job. Both the driver and executors rely on the path in order to find the program logic and start the task.
If you watch the pod list while the job is running using kubectl get pods, you will see a "driver" pod be initialized with the name provided in the SPARK_DRIVER_NAME variable. This will in turn launch executor pods where the work will actually be performed. When the program has finished running, the driver pod will remain with a "Completed" status. You can retrieve the results from the pod logs using:
# Retrieve the results of the program from the cluster
kubectl logs $SPARK_DRIVER_NAME
Toward the end of the application log you should see a result line similar to the one below:
19/11/30 02:07:17 INFO DAGScheduler: Job 0 finished: reduce at SparkPi.scala:38, took 9.451986 s
Pi is roughly 3.14152099141521
Client Mode Applications
When we switch from cluster to client mode, instead of running in a separate pod, the driver will run within the jump pod instance. This requires an additional degree of preparation, specifically:
- Because executors need to be able to connect to the driver application, we need to ensure that it is possible to route traffic to the pod and that we have published a port which the executors can use to communicate. To make the pod instance (easily) routable, we will create a headless service.
- Since the driver will be running from the jump pod, we need to modify the
SPARK_DRIVER_NAMEenvironment variable to reference that rather than an external (to be launched) pod. - We need to provide additional configuration options to reference the driver host and port. These should then be passed to
spark-submitvia thespark.driver.hostandspark.driver.portoptions, respectively.
Running Client Mode Applications Using spark-submit
To test client mode on the cluster, let's make the changes outlined above and then submit SparkPi a second time.
To start, because the driver will be running from the jump pod, let's modify SPARK_DRIVER_NAME environment variable and specify which port the executors should use for communicating their status.
# Modify the name of the spark driver
export SPARK_DRIVER_NAME=spark-test-pod
export SPARK_DRIVER_PORT=20020
Next, to route traffic to the pod, we need to either have a domain or IP address. In Kubernetes, the most convenient way to get a stable network identifier is to create a service object. The command below will create a "headless" service that will allow other pods to look up the jump pod using its name and namespace.
# Expose the jump pod using a headless service
kubectl expose pod $SPARK_DRIVER_NAME --port=$SPARK_DRIVER_PORT \
  --type=ClusterIP --cluster-ip=None
Taking into account the changes above, the new spark-submit command will be similar to the one below:
/opt/spark/bin/spark-submit --name sparkpi-test1 \
   --master k8s://https://kubernetes.default:443 \
  --deploy-mode client  \
  --class org.apache.spark.examples.SparkPi  \
  --conf spark.kubernetes.driver.pod.name=$SPARK_DRIVER_NAME  \
  --conf spark.kubernetes.authenticate.subdmission.caCertFile=$K8S_CACERT  \
  --conf spark.kubernetes.authenticate.submission.oauthTokenFile=$K8S_TOKEN  \
  --conf spark.kubernetes.authenticate.driver.serviceAccountName=$SA  \
  --conf spark.kubernetes.namespace=$SPARK_NAMESPACE  \
  --conf spark.executor.instances=2  \
  --conf spark.kubernetes.container.image=$DOCKER_IMAGE  \
  --conf spark.kubernetes.container.image.pullPolicy=Always \
  --conf spark.driver.host=$HOSTNAME.$SPARK_NAMESPACE \
  --conf spark.driver.port=$SPARK_DRIVER_PORT \
  local:///opt/spark/examples/jars/spark-examples_2.11-2.4.4.jar 1000
Upon submitting the job, the driver will start and launch executors that report their progress. For this reason, we will see the results reported directly to stdout of the jump pod, rather than requiring we fetch the logs of a secondary pod instance.
As in the previous example, you should be able to find a line reporting the calculated value of Pi.
Starting the pyspark Shell
At this point, we've assembled all the pieces to show how an interactive Spark program (like the pyspark shell) might be launched. Similar to the client mode application, the shell will directly connect with executor pods which allows for calculations and other logic to be distributed, aggregated, and reported back without needing a secondary pod to manage the application execution.
The command below shows the options and arguments required to start the shell. It is similar to the spark-submit commands we've seen previously (with many of the same options), but there are some distinctions. The most consequential differences are:
- The shell is started using the
pysparkscript rather thanspark-submit(pysparkis located in the same/opt/spark/bindirectory asspark-submit) - There is no main class or
jarfile referenced
/opt/spark/bin/pyspark --name pyspark-test1 \
   --master k8s://https://kubernetes.default:443 \
  --deploy-mode client  \
  --conf spark.kubernetes.driver.pod.name=$SPARK_DRIVER_NAME  \
  --conf spark.kubernetes.authenticate.subdmission.caCertFile=$K8S_CACERT  \
  --conf spark.kubernetes.authenticate.submission.oauthTokenFile=$K8S_TOKEN  \
  --conf spark.kubernetes.authenticate.driver.serviceAccountName=$SA  \
  --conf spark.kubernetes.namespace=$SPARK_NAMESPACE  \
  --conf spark.executor.instances=2  \
  --conf spark.kubernetes.container.image=$DOCKER_IMAGE  \
  --conf spark.kubernetes.container.image.pullPolicy=Always \
  --conf spark.driver.host=$HOSTNAME.$SPARK_NAMESPACE \
  --conf spark.driver.port=$SPARK_DRIVER_PORT
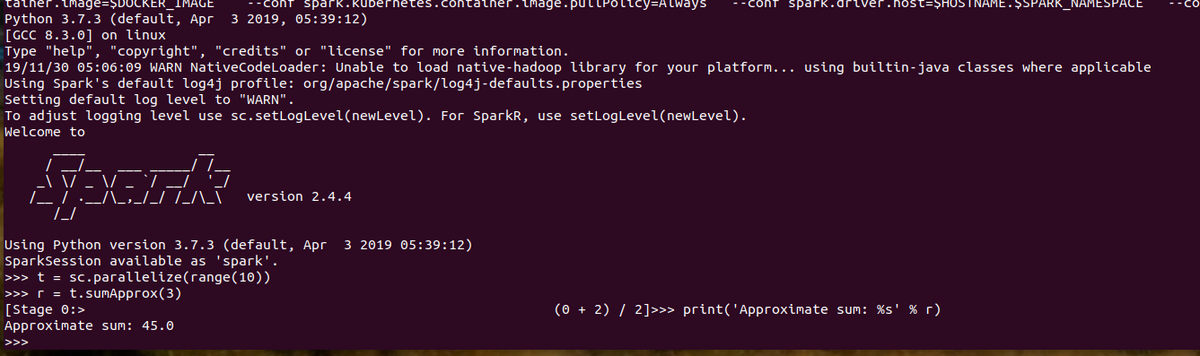
After launch, it will take a few seconds or minutes for Spark to pull the executor container images and configure pods. When ready, the shell prompt will load. At that point, we can run a distributed Spark calculation to test the configuration:
# Create a distributed data set to test the session.
t = sc.parallelize(range(10))

# Calculate the approximate sum of values in the dataset
r = t.sumApprox(3)
print('Approximate sum: %s' % r)
If everything works as expected, you should see something similar to the output below:
Approximate sum: 45
You can exit the shell by typing exit() or by pressing Ctrl+D. The spark-test-pod instance will delete itself automatically because the --rm=true option was used when it was created. You will need to manually remove the service created using kubectl expose. If you followed the earlier instructions, kubectl delete svc spark-test-pod should remove the object.
Next Steps
Running Spark on the same Kubernetes infrastructure that you use for application deployment allows you to consolidate Big Data workloads inside the same infrastructure you use for everything else. In this article, we've seen how you can use jump pods and custom images to run Spark applications in both cluster and client mode.
While useful by itself, this foundation opens the door to deploying Spark alongside more complex analytic environments such as Jupyter or JupyterHub. In Part 2 of this series, we will show how to extend the driver container with additional Python components and access our cluster resources from a Jupyter Kernel.
Comments
Loading
No results found