Managing Users and Access In Sonador
User identity management and access control (sometimes called IAM), are two of the most complex aspects of creating secure software. Even so, they are essential to ensuring that sensitive data remains protected.
There are two main challenges that IAM systems attempt to solve:
- Authentication: ensuring that a user is who they claim to be. There are many ways for a user to prove their identity: authentication using usernames/passwords, entering the values of one-time PINs (perhaps sent to a mobile phone), providing biometric information, verifying the answers to security questions, and many others. The job of authentication software is to ensure that authentication is secure and hackers are unable to compromise the system. Once authenticated, IAM software then ensures that every request and interaction is associated with a trusted identity.
- Authorization: determine what resources a user may access. Through the use of access controls, policies, and roles; authorization systems ensure that users are only able to see and modify data for which they have the correct permissions.
In any IAM system, there are many moving pieces and it is easy to make a mistake. Because of the challenges, the security community has published guidelines and best practices that can help application developers secure their data. One emerging pattern is to split authentication and authorization into separate concerns and then use centralized systems (sometimes called an Identity Providers or IdPs) to handle authentication, and a protocol (such as OpenID Connect or SAML) to allow for a "client application" to verify the identity of users. Robust authorization can then be built on top of this external "security service." There are several benefits to this approach:
- it allows better integration into large organizations via Single Sign On (SSO), allowing users to use the same credentials for every system in the business rather than requiring them to memorize multiple usernames and passwords
- improved breach mitigation in the case of an account being compromised, as there is only a single place required to disable access across the whole organization
- the security service can help with regulatory compliance by providing an audit trail which tracks when users access specific applications
The Sonador Medical Imaging platform follows this pattern and uses an external IdP to verify user identity. Authorization is managed using an internal group based permission system (with the option to sync those groups with the IdP). In this blog post, we'll look at how security is implemented in Sonador and discuss the fundamental components for the authentication of users and authorization of API requests.
- First, we'll review the specifics of how the Sonador web application coordinates authentication workflows and the interacting components needed to issue an "access token" via the OpenID Connect (OIDC) "access code" workflow.
- Next, we'll discuss the steps needed to configure an "OpenID Provider" and "Authentication Server" to take advantage of Single Sign On (SSO) capabilities.
- Finally, we'll demonstrate how to configure and test AWS Cognito as an IdP.
Overview of Security in Sonador
Sonador's data storage system (called Sonador IO) is composed of a set of microservices which interact to securely store medical images so that they can be queried, retrieved, and transferred. There are three primary components:
- Sonador Web Application: provides user and group management, role based access control, authentication/authorization workflows, service discovery, centralized configuration of imaging servers, and integration APIs.
- Orthanc: medical imaging database used for indexing and storing medical imaging resources.
- OHIF: web-based viewer with support for a wide range of modalities (MRI, CT, ultrasound, X-ray, and more), 2D/3D visualization, segmentation (DICOM-SEG) and structured reporting (DICOM-SR), and whole slide imaging.
The Sonador web application is the central security hub and provides authentication (via an external IdP and OIDC) and authorization services. OHIF, Orthanc, and third party applications use the web app to retrieve access tokens and authorize requests. Examples of how these systems work include:
- Authentication: OHIF uses a Sonador mediated OIDC access code workflow (additional details below) for obtaining oAuth2 access tokens to retrieve imaging resources. These "bearer" tokens are attached to requests sent to Orthanc and other systems as proof of identity.
- Authorization: Orthanc (via the advanced authorization plugin) communicates with Sonador's "introspection" API to validate API tokens. The token is forwarded to Sonador, which determines which user the token is associated with, verifies that the token is valid, and authorizes (or denies) the request.
Core Concepts
To make all of this work, the Sonador web app uses a number of interacting components:
- User: a person or service account that needs access to application resources.
- Group: a collection of users that share common properties and are used to attach permissions to collections of resources.
- Applications: things that users log into. In OpenID Connect, applications are registered with an IdP, and verified using a "client ID" and "client secret." A Sonador deployment is an application.
- Scope: set of information (such as a username and email) that the application needs to create an account for the user. The requested scopes are part of the application registration on the IdP..
- OpenID Provider: profile that describes an IdP service used by Sonador. It includes the endpoints needed to execute security workflows and custom logic to parse responses. Example providers include Google Connect, Azure AD, AWS Cognito, and Oak-Tree Acorn. OpenID Providers are managed from within Sonador.
- Authentication Server: stores the application identifiers (client ID and client secret) which link the Sonador instance and the IdP that will be used for authentication. Authentication servers are always associated with an OpenID Provider.
- Imaging Server: Orthanc instance containing resources which a user may attempt to retrieve. Resource permissions in Sonador are associated with a group and attached to imaging servers.
- Access Tokens: credential obtained from Sonador after successful authentication which are used to make requests on behalf of a user. Access tokens in Sonador are JSON Web Tokens (JWT) tied to a "user session" that are cryptographically signed to ensure their validity.
Sonador uses an external IdP (such as Keycloak, AWS Cognito, Google Identity Platform, Azure Active Directory, FusionAuth, Okta, or Acorn) to verify a user's identity and issue an access token. The IdP is aware of Sonador and will authorize users on its behalf because Sonador was registered at some point in the past as an application and is able to provide a known client ID and matching secret. The workflow required to orchestrate the entire process is defined by an OpenID Provider and authentication server. As part of the authentication workflow, Sonador will create internal users matching the details provided by the IdP which can then be added to groups which determine what resources the user can access.

OpenID Connect (OIDC)
The workflow reponsible for authenticating users in Sonador and issuing access tokens is called the "authorization code flow" and is shown in the figure above. It is redirect based and keeps client credentials private.
- The workflow is initaited when the user navigates to the OHIF viewer (or another integrated application) that does not have an access token. The viewer will detect the lack of credentials and redirects to the Sonador web app (step in the 1 figure above).
- The Sonador web app initates the login process by creating a URL for the IdP which includes the application client ID, requested scopes, "local state," and a Sonador URL to which the IdP should redirect after successful auth; and forwards the user to the IdP for authentication (step 3).
- When the user arrives on the IdP, it will check the application client ID to ensure that Sonador is registered and will then prompt the user for credentials (step 4). If the user provides valid credentials, the IdP will redirect the user back to the viewer with an "ID" or "authorization" code (step 5).
- Next, the viewer submits a request to Sonador using the ID code and requests an access token (step 6). When it receives the ID code, Sonador will make a direct request to the IdP in order to verify the ID code (step 7). If the code is valid, Sonador will return an access token that can be used by the viewer to request imaging resources from Orthanc and other systems within Sonador (step 8).
Resource Access Control
Access tokens in Sonador are associated with a specific user account, tied to a session, limited in duration, and cryptographically signed to ensure that they have not been tampered with. Sonador's "introspection" API is used by Orthanc (and other external applications) to submit validation requests, which are then authorized or denied based on what resources are requested and the permissions associated with the user account.
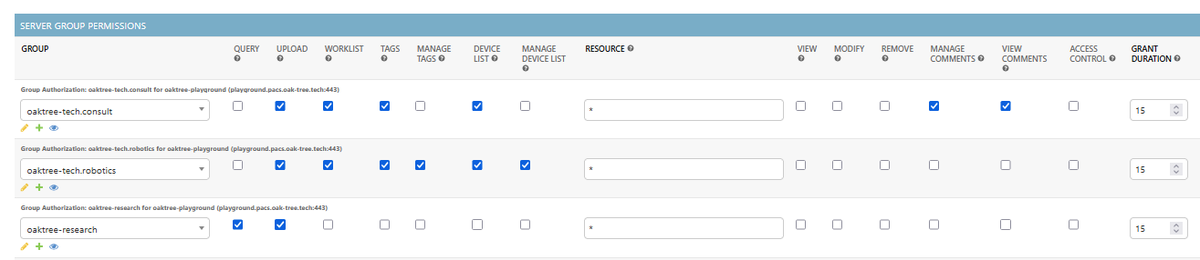
The primary way that permissions are assigned to users is through the use of an access control list (ACL) associated with a group and imaging server. Sonador has limited support for "roles," but these are normally only used for administrative or system accounts (additional detail below). The ACL indicates what resources on the imaging server members of the group are able to access or modify. If users are not members of a group with the needed permissions to access or modify a resource, the authorization request will be denied and Orthanc will block the operation. Users can be added or removed from a group using the Sonador administration console, and changes take effect immediately.
Role Based Access
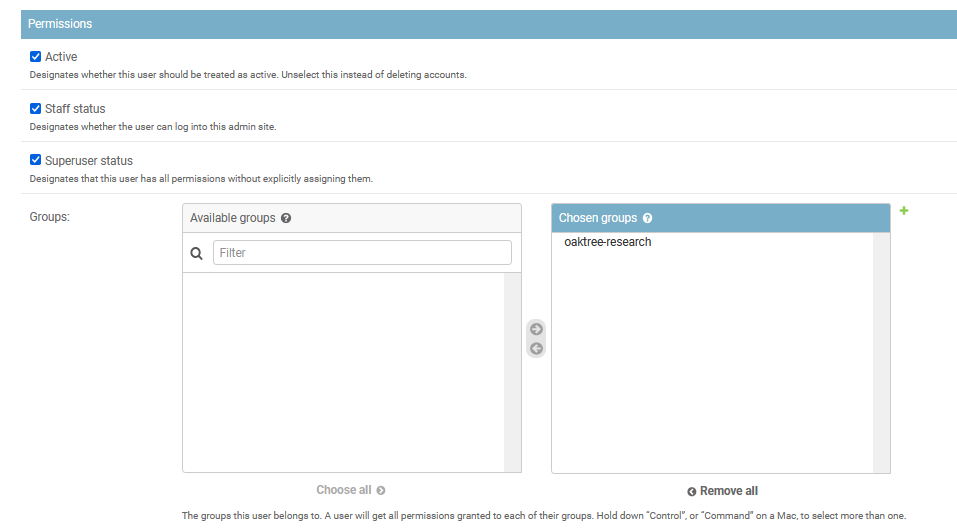
Within Sonador there are two special roles that can be assigned to users: "staff" and "superuser."
- The "staff" permission gives access to backend APIs and the administrative console, but not to medical imaging resources. Even though staff users have access to the Sonador admin console, they are limited to viewing/modifying configuration options for which they have been explicitly authorized.
- The "superuser" permission grants access to all resources managed by Sonador including configuration, medical imaging resources, and data services. In practice, it should only be granted to administrative and system accounts.
Configure Cognito as an Identity Provider for SSO
When first deployed, Sonador provides access for "database" users (usually configured using the manage.py createsuperuser command), which are local accounts intended for backend administration. Database users are only able to authenticate via the Sonador admin console.
To enable outside users to authenticate to Sonador, you must configure an IdP, OpenID Provider, and Auth Server. In this section, we'll walk step-by-step through the process to configure AWS Cognito as an IdP. The general steps we need to follow are:
- Create a user pool in Cognito which manages the users who will authenticate to Sonador. Cognito supports social and enterprise federation, which allows for users to sign in through social media accounts like Apple, Google, or Facebook; or through enterprise systems such as LDAP. How to configure federated login using Cognito is beyond the scope of this article.
- Configure the Sonador application details in Cognito.
- Configure the Cognito instance as an Identity Provider in Sonador.
- Link the two together with an Auth Server and determine correct redirect URIs to register with Cognito.
- Create a user in Cognito and test.
Step 1: Create Cognito User Pool
Cognito instances are managed using the AWS Console. To load the Cognito panel, log into your AWS account and search for "Cognito."
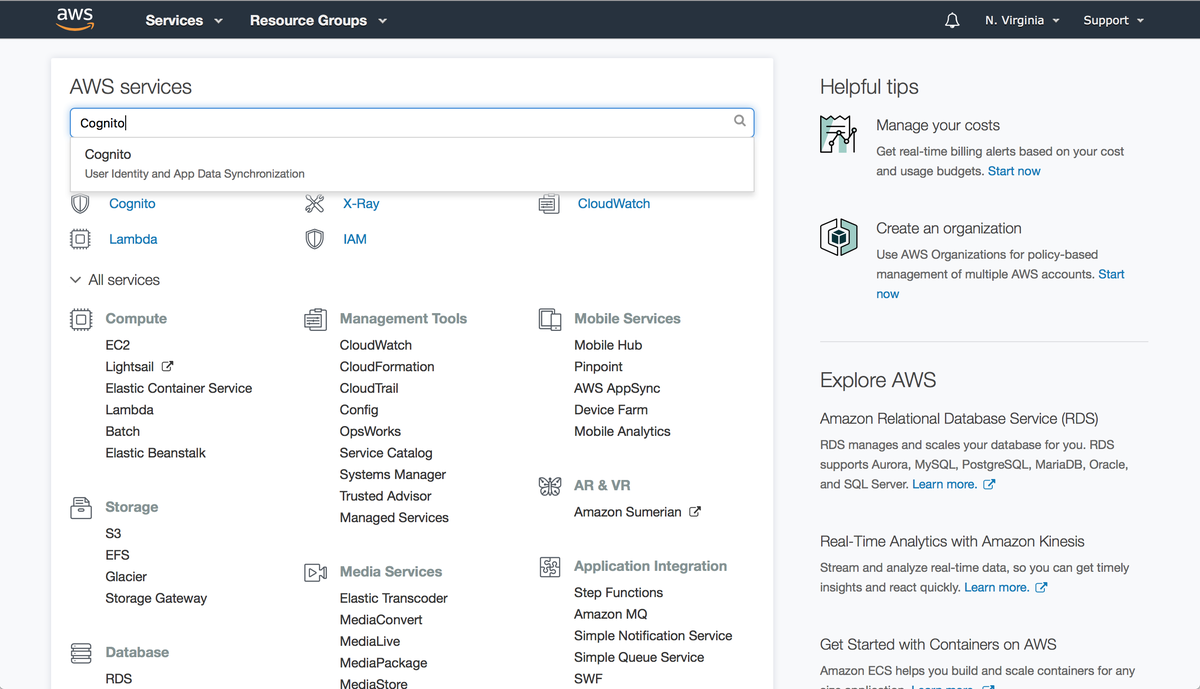
To create a user pool click on "Manage User Pools" and then click on "Create a User Pool." Follow the instructions to provide a name and other base settings for the pool and to configure the login/security options as needed for your application. Ignore the "App Client" and "Triggers" sections for now, we'll return to these in a later step.
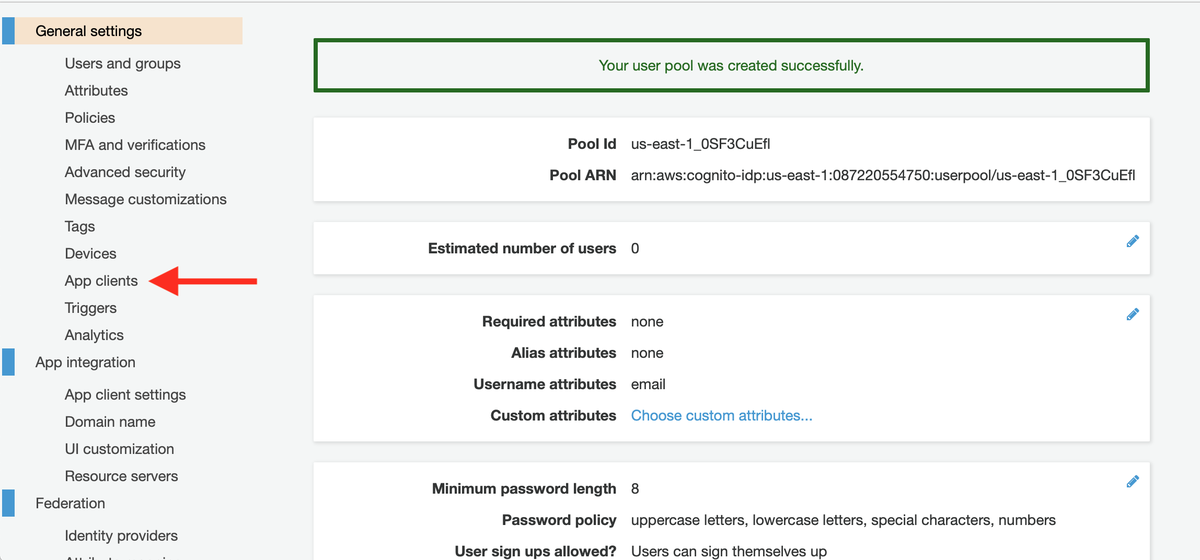
Once the pool has been created, take note of the Pool ID, Pool ARN, and region the pool was created in. These identifiers are needed for configuring Sonador.
Step 2: Configure Sonador as an App Client in Cognito
Now that you have a user pool, the next step is to configure Sonador as an OpenID application in Cognito. To access the application settings, click on the "App clients" link in the sidebar.
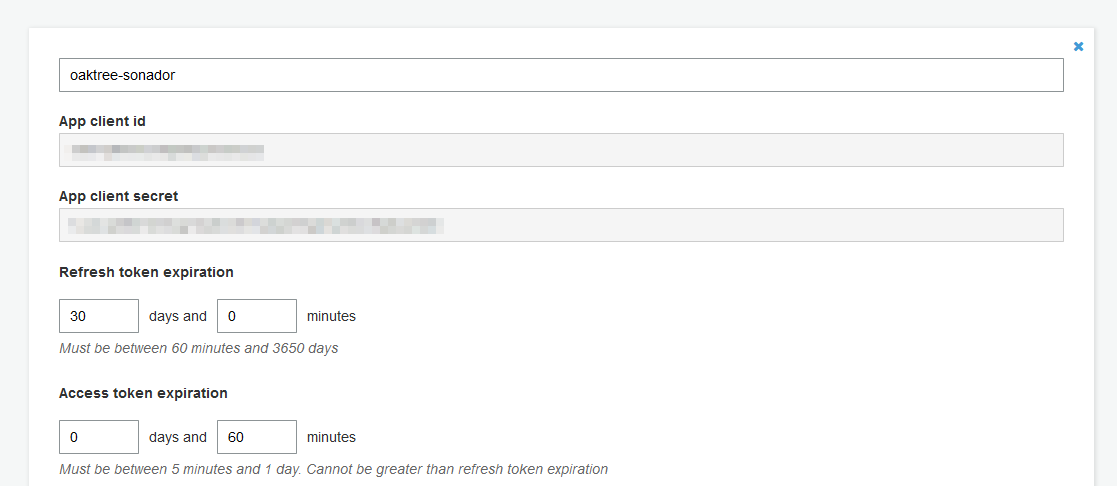
When the "App clients" pane loads, click on the “Add an app client” button. You will be prompted to create a name for your app client and to enter a "refresh token" time. Make sure the "generate client secret" option is selected and that the Username and Password sections in the "Auth Flows Configuration" section are selected (in addition to any other options you would like to have enabled).
To create the application, click on the "Create app client" button.
After the client application is generated, make note of the "App client id" and "app client secret." The ID and secret will be needed to configure Sonador.
Step 3: Create Cognito DNS
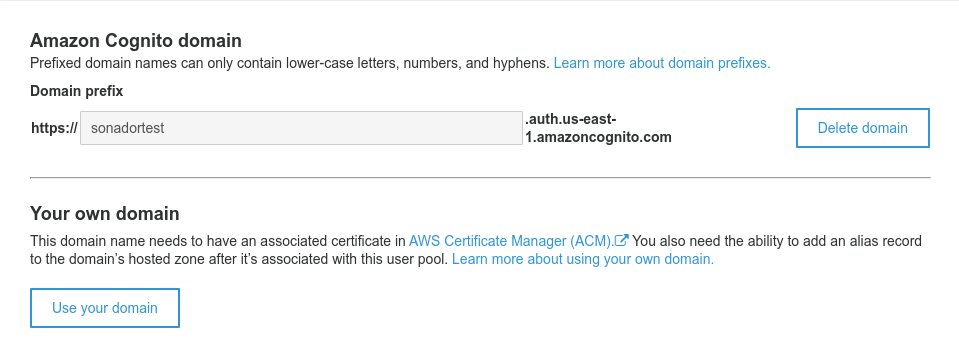
To use the newly created Cognito instance, you need a DNS domain for your app. This allows for Sonador to route authentication API calls and for users to authenticate.
To create the domain, click on the "Domain name" link under the "App Integration" section of the sidebar which will load the Domain management panel. The panel will prompt you to create a domain name, check it's availability, and confirm it.
When finished, click on the "Save Settings" button.
Important: At this point, the Cognito configuration is incomplete and requires details from Sonador (such as the callback URLs) before it will work. These will be added in a later step.
Step 4: Configure Sonador OpenID Provider
Log into to your Sonador instance admin and navigate to the "Social Media Application OpenID Providers" section and click "Add a Social Media Application OpenID Provider".

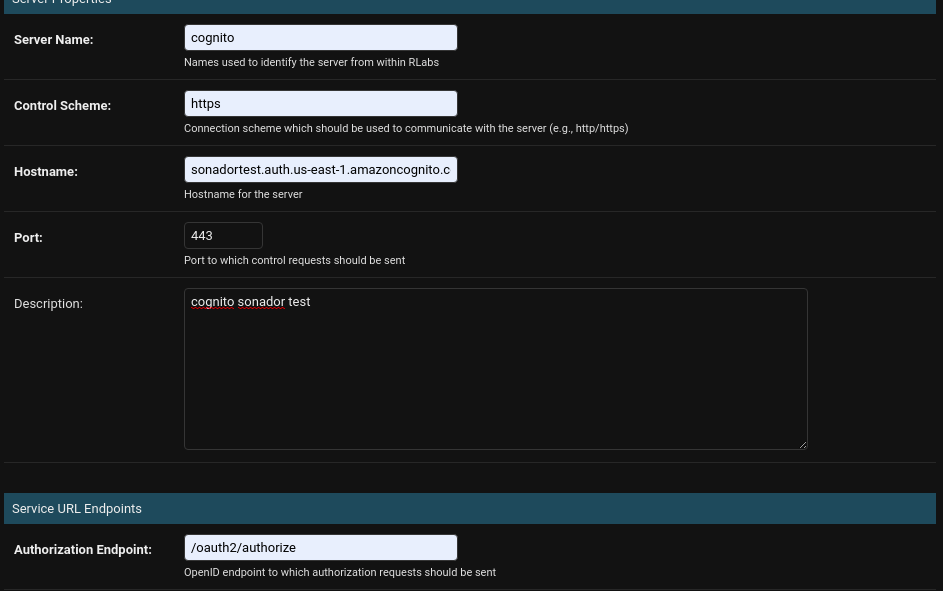
In the "Add Social Media Application Authorization Provider" panel, populate the settings with the following options:
- Name: Cognito
- Scheme:
https - Hostname: hostname that you created earlier. Example:
sonadortest.auth.us-east-1.amazoncognito.com - Port: 443
- Description: description of the provider. Example: "Cognito Sonador test provider"
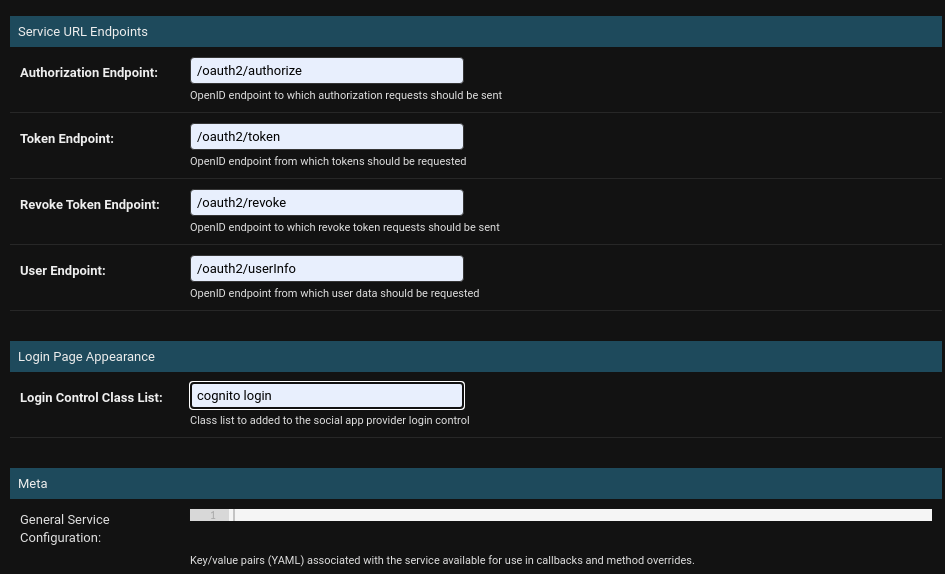
- Authorization Endpoint:
/oauth2/authorize - Token Endpoint:
/oauth2/token - Revoke Token Endpoint:
/oauth2/revoke - User Endpoint:
/oauth2/userInfo - Login Control Class List:
cognito aws login
Then, add the following code snippets to provide the parsing logic for the Cognito provider.
Retrieve Authorization Token
def get_authorization_token(instance, url_redirect, code):
    """ Retrieve authorization token from Cognito using the provided access code
    """
    # Prepare request data
    rdata = instance._authorization_token_request_data(url_redirect, code)
    rdata.update({
        'client_id': instance.client_id,
        'grant_type': "authorization_code",
    })

    try:
        rauth = server_request_post(server_controlurl(instance, instance.endpoint_token),
            rdata, headers={
                'Content-Type': 'application/x-www-form-urlencoded'
            },
            auth=(instance.client_id, instance.client_secret), json_data=False)
        authtoken_data = server_controloperation_json_response(rauth)
    except Exception as err:
        raise Exception('%s\n%s' % (getattr(err, "details", None), rdata))

    # Ensure that the token includes a token type
    if not authtoken_data.get(instance.authtoken_class.access_token_type_attr):
        authtoken_data[instance.authtoken_class.access_token_type_attr] = 'bearer'

    return instance.authtoken_class(instance, authtoken_data)
Revoke Authorization Token
def revoke_authorization_token(instance, access_token, token_type):
     """ Revoke the provided access token
     """
     pass
Retrieve Service User
def get_user(instance, access_token):
    """ Retrieve the user associated with the provided access token
    """
    # Retrieve user data from the graph API
    userdata = server_controloperation_get(
        server_controlurl(instance, instance.endpoint_user), headers={
            "Authorization": "Bearer %s" % access_token.access_token
        })

    # The social user classes require a username as the unique identifier
    # so annotate username from the response if not present
    if not userdata.get('username'):
        userdata['username'] = userdata.get('preffered_username')

    # Retrieve first and last name
    if not userdata.get("first_name"):
        userdata['first_name'] = userdata.get('given_name')
    if not userdata.get('last_name'):
        userdata['last_name'] = userdata.get('last_name')

    return instance.user_class(instance, userdata)
Click on the "Save" button to create the OpenID Provider.
Step 5: Link Sonador and Cognito via an Authentication Server
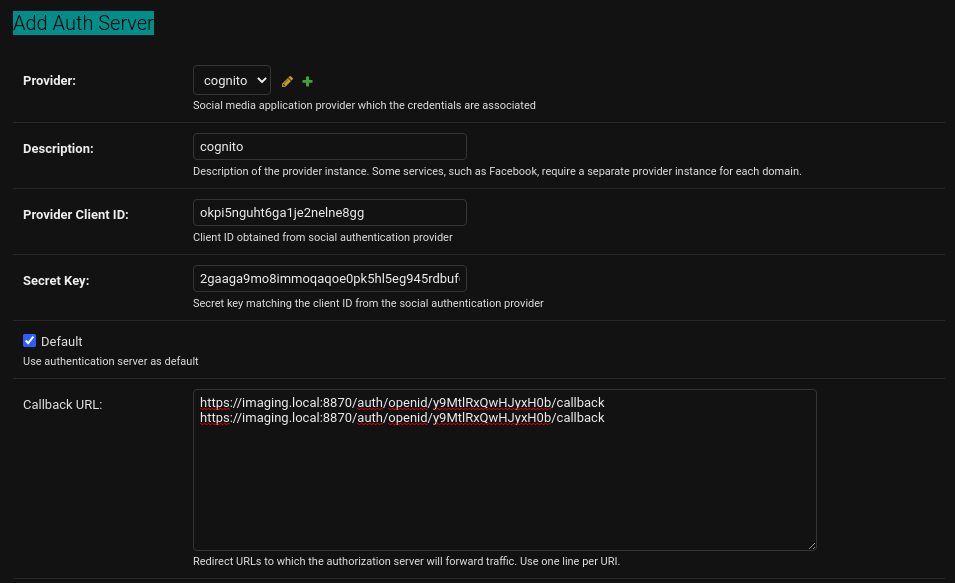
Once the OpenID Provider is created, the next step is to create an "Authentication Server" that will link Cognito and the Sonador instance. To create an Authentication Server, click on the "Authentication Servers" link under the "Authentication and Authorization" section in the admin console. Then click on the "Add Auth Server" button.

Add the following settings:
- Provider: select the Cognito provider that you created in the previous step.
- Description: description of the authentication server. Example: "Cognito test server".
- Provider Client ID: Cognito application client ID created earlier.
- Secret Key: Cognito application secret key created earlier.
Check the box that says "Default," and click "Save." Note: If you will be configuring other applications, such as a standalone build of OHIF, to utilize the Auth Server; populate the Redirect URL input with the desired callback URLs (one per each line). Refer to "Configuring Sonador to Allow for Remote OHIF Development" for additional information.
After the auth server is saved, it will return you to the Auth Server management panel. Locate the server instance you just created and take note of the auth server token which appears in the first column of the server list (next to provider column). This value uniquely identifies the server and is used in Sonador OIDC URLs such as the login and callback URL.

Copy the "OpenID Callback URL" from the second to the last column. It will follow the general pattern of /auth/openid/{{ authserver-id }}/callback, example: /auth/openid/g9NtlrXqwhJyxH0b/callback. This value is needed to finish the application registration in Cognito.
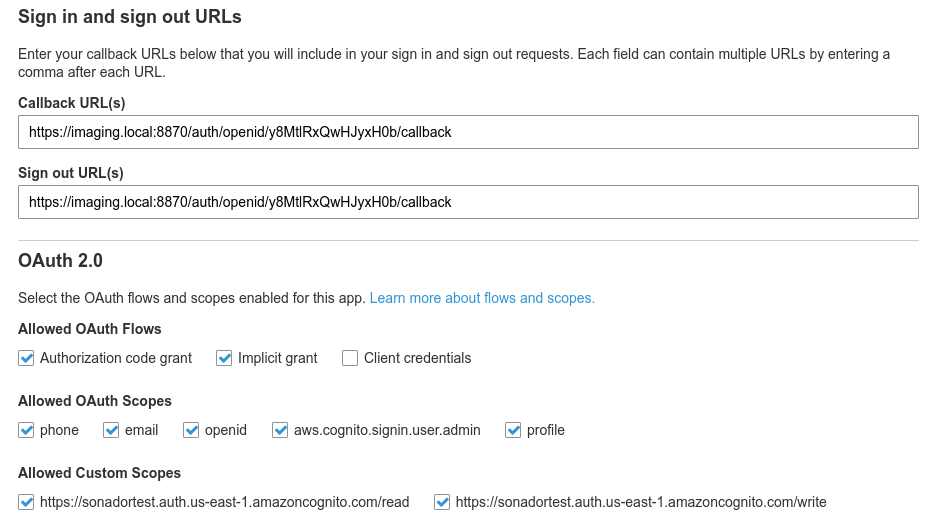
Step 6: Add Sonador OIDC Callback URL to Cognito Configuration
Because OIDC uses redirects to pass sensitive information, it requires a white list of URLs to which it is authorized to send traffic. This prevents a hacker from hijacking one of the redirects and intercepting sensitive information such as the client ID or an access code.
To register the callback URL for the Auth Server created in the previous step, navigate to Cognito and click on the "App Client Settings" link under the "App Integration" section. Then in the "Callback URL(s)" box, add the fully qualified URL for the callback endpoint. It will have the general form: {{ scheme }}://{{ sonador-url}}:{{ port }}/auth/openid/{{ authserver-id }}/callback. Example: https://imaging.local:8870/auth/openid/g9NtlrXqwhJyxH0b/callback.
Important: the callback URL registered in Cognito must match that generated by Sonador exactly. If the Sonador instance is using the standard https port of 443, it is not necessary to include the port in the URL. Cognito only supports https URLs.
Place the callback URL in the "Sign out URL(s)" box in addition to the "Callback URL(s)" box and click "Save Settings" to apply the changes.
Important: Sonador dynamically generates its callback URL using the domain entered under "Sites" and the settings from the Site-Connection section of the site config. If you encounter errors while testing in the next step, review the domain entered in the Sites panel of the Sonador admin and the SITE_CONNECT_PORT / SITE_CONNECT_SCHEME settings of the config file. For https domains (which is required by Cognito) the SITE_CONNECT_MATCH_SITE_SCHEME and SITE_CONNECT_MATCH_SITE_NETLOC options must also be enabled.
The listing below shows the Site-Connect section of the site config for the Sonador instance in this article.
...

[Site-Connection]
SITE_CONNECT_SCHEME = 'https' # Site connection scheme (production)
SITE_CONNECT_PORT = '8870' # If different from http/https defaults (80/443)
SITE_CONNECT_SCHEME_DEVEL = 'https' # Connection connection scheme (development)
SITE_CONNECT_PORT_DEVEL = '8870' # Connection port (development)
SITE_CONNECT_MATCH_SITE_SCHEME = True
SITE_CONNECT_MATCH_SITE_NETLOC = True
BASE_URL = 'https://imaging.local:8870'

...
Step 6: Create Cognito User and Test Integration
Once Cognito has been configured as an IdP, an OpenID Provider has been created, and Sonador/Cognito are linked using an Auth Server; it is possible to test the configuration.
In Cognito, navigate to the "Users and Groups" tab and create a test user.
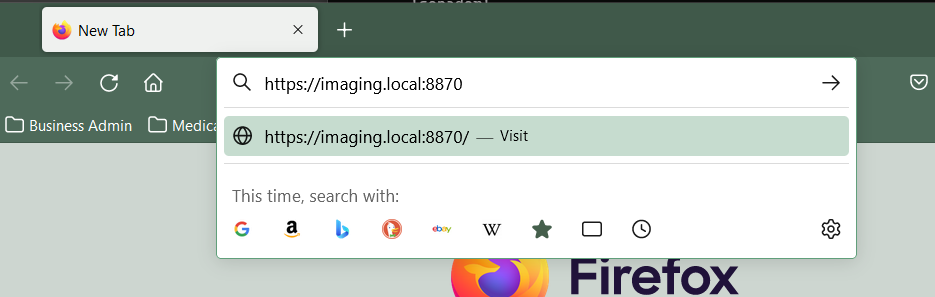
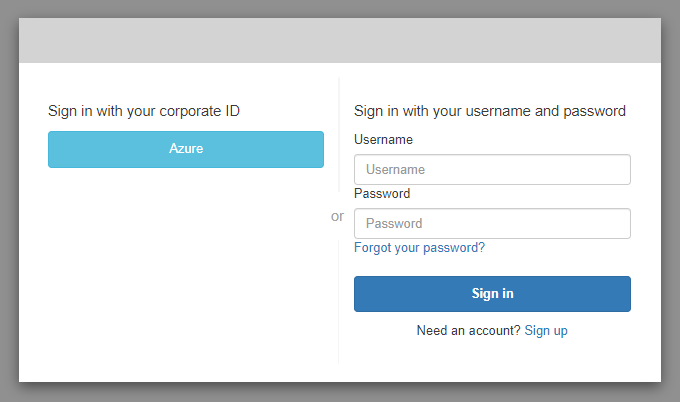
Then, open a new tab and navigate to the frontend (viewer) URL of Sonador. If everything is configured correctly, you will be redirected to a Cognito login page to provide your credentials. Upon successful authentication you be redirected a second time back to the Sonador OHIF viewer.
Conclusion
Sonador's authentication system implements Zero-trust security through oAuth2-compliant identity management and OpenID Connect auth workflows. It provides a solid foundation for user identity, authentication via Remote Identity Providers (such as Amazon Cognito), and resource authorization allowing every request in Sonador to be authenticated, every token to be auditable, and to allow for a unified identity in enterprise environments.
This foundation of verified identity enables the type of fine-grained authorization controls required in modern healthcare environments. In Part 2 of this series, "Resource Access Control (ACL) in Sonador: Implementing Zero-Trust Security" we'll look at how authentication and authorization allows for sophisticated and compliant workflows such as preoperative planning.
Documentation
- Why Zero-Trust Security is Essential: a Real-World Lesson for Business. Zero-trust security constantly validates access in today's perimeter-less digital landscape, crucial for reputation, finances, and operational continuity for businesses.
- Resource Access Control (ACL) in Sonador: Implementing Zero-Trust Security. Authorization ensures that every user, service, and application can only access the data and actions appropriate to their role. This article explains how Sonador enforces fine-grained permissions through its Authorization Engine and Resource Access Control Lists (ACLs), enabling secure, role-driven collaboration across imaging, planning, and surgical workflows.
- Sonador Authentication Credentials. Sonador documentation page describing credentials in the platform, token types, interactions with the user model and how they can be managed via the platform's API.
- Resource Authorization. Sonador Documentation page describing the Resource ACL API, permission types, and platform endpoints.
- Orthanc Advanced Authorization Plugin. Orthanc documentation page describing the Orthanc Authorization Plugin, integration specification, and configuration options.
Comments
Loading
No results found