Resource Access Control (ACL) in Sonador: Implementing Zero-Trust Security
In healthcare, protecting patient data isn't optional. It's a legal, ethical, and operational imperative. Across jurisdictions, privacy frameworks such as the HIPAA Privacy, Security, and Breach Notification Rules in the United States; the General Data Protection Regulation (GDPR) in the European Union; The Australian Privacy Principles (APPs), and the New Zealand Health Information Privacy Code (HIPC) converge on a shared principle: health information must remain protected, traceable, and under the control of those who are authorized to use it. The frameworks may differ in terminology and scope, but they all require verifiable accountability, least-privilege access, and clear auditability across every point of data exchange.
Compliance in this context isn't a static checkbox, it's a living process of continuous validation. To manage health data responsibly, an organization must not only confirm who is requesting access but also define what they can reach and how that access applies. These two pillars -- authentication and authorization -- form the backbone of secure digital health systems. Authentication governs who a user or service is, authorizations governs what they are permitted to do and where they may do it. Together, they determine whether an action should be allowed and under what conditions it remains compliant.
This article is the second in Sonador's ongoing series on Authentication and Authorization within the Sonador Data Imaging Platform. The first article explored identity managemen and authentication. It provided an overview of how Sonador integrates with enterprise identity providers (IdPs) using OpenID Connect (OIDC) to authenticate users and issue secure tokens. That foundation ensures that every participant in a workflow (whether clinician, research or application) can be uniquely identified and trusted.
In this article, we will shift focus from "who" to "what and where" and look at how Sonador's Resource Control Lists (ACLs) and Authorization Engine enforce fine-grained permissions throughout the platform. We'll examine how global and local policies work together to secure sensitive DICOM data, how Orthanc's Advanced Authorization Plugin integrates into the process, and how Server Roles combine group memberships and permissions to create flexible, clinically meaningful access patterns. The result is a practical exploration of how Zero-trust principles translate into operational compliance and data protection.
Resource ACLs in Action: 3D Preoperative Planning
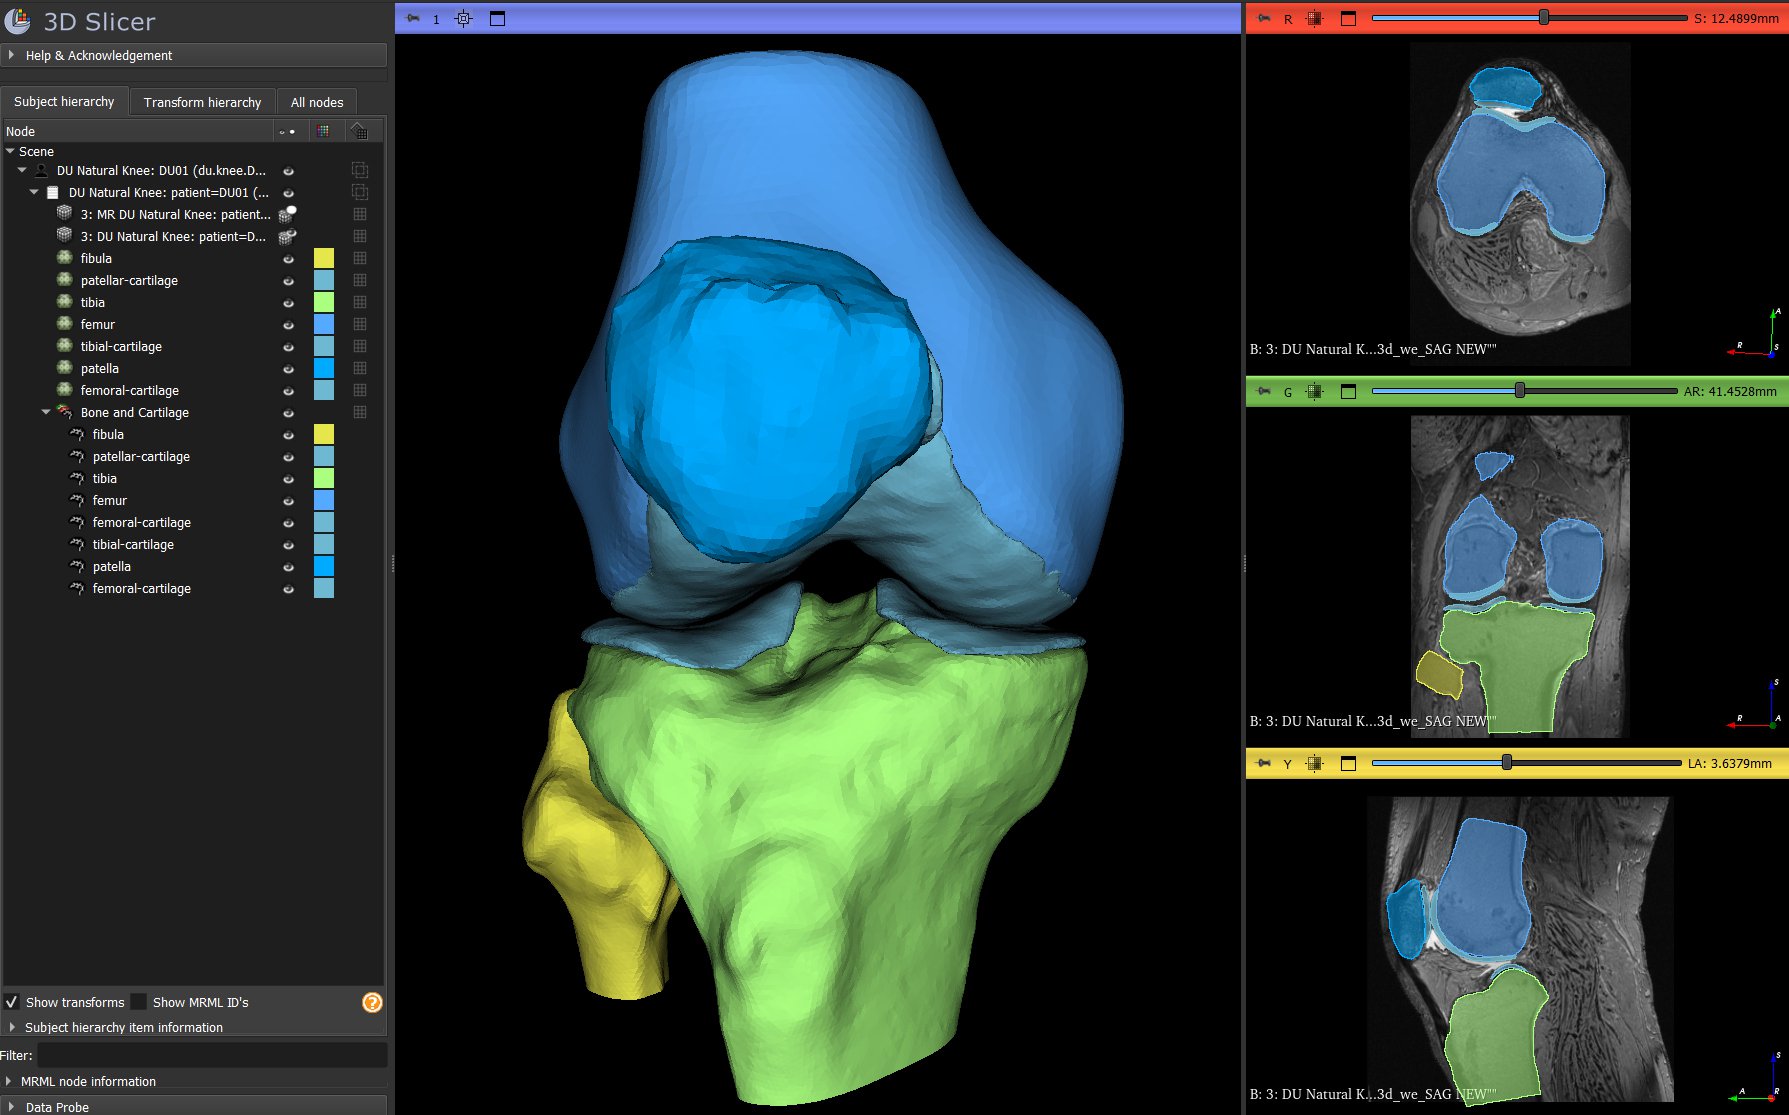
Modern 3D preoperative planning exemplifies the complexity of integrated clinical workflows and the need for precise, role-aware access control. Delivering a personalized surgical plan for a total knee replacement involves many participants: surgeons, primary care providers (imaging technicians, radiologists, AI services, and case processing engineers), all working together across imaging systems, planning software, and manufacturing platforms. Each stage depends on sensitive patient data flowing securely between independent systems: MRI and CT scanners capture source imagery; radiologists validate segmentation results; engineers refine models and generate patient-specific cutting guides; and surgeons review, annotate, and approve final plans.

Managing this type of workflow is difficult as the applications involved need access to different information. Segmentation systems need the MRI data; alignment and landmarking steps require x-ray, MRI, and bone models created during segmentation; cutting guide generation requires the bone models and landmark points; and manufacturing requires the files for 3D printing. Complicating the system even further, some types of users may require more extensive access based or different levels of access than others. A surgeon needs complete visibility of all the data within their patient cases, but should not be able to see other surgeons' patients. In contrast, an AI service needs to be able to read imaging data but should not be able to delete it.
Within Sonador, these challenges are addressed through a Zero-trust security architecture and the application of server, group, and resource (local and global) permissions. Every request is treated as untrusted until verified. The Resource Access Control List (ACL) system serves as the policy backbone that governs every hand-off. It enforces least-access permissions so that each participant can perform their role (but only their role) within the shared workflow and allows for "roles" to be attached to specific groups granting the access needed.
In practice for preoperative planning this means that a role for each type of system and provider is defined with a mix of permissions (upload , view, modify, etc). Modalities and “Dropbox” systems upload studies, imaging teams review and approve them, AI services perform segmentation and landmarking, radiologists verify outputs, processing technicians generate 3D surgical models, and surgeons finalize the plan. Throughout the process, patients are able to view and share their data. These roles along with the permissions needed to create them will be looked at in more detail later in this article.


At each step, ACL policies ensure that access is constrained to the relevant data and actions (upload, review, approve, comment, or download) maintaining both compliance and trust. By mediating every exchange of information between applications, users, and devices, Sonador enables complex, multi-institutional workflows into a secure, transparent, and traceable process from image acquisition to execution of the surgery.
Architecture
Sonador's Resource ACL framework provides a system to define permissions for server, group, and resources. Groups of permissions (referred to as policies) are associated with a group or user and grant permission to access the resource. Policies are applied dynamically via secure APIs and credentialed sessions, supporting both direct user authentication and delegated application access. Each operation within the platform is authenticated through token-based credentials and validated against the central authorization service which is implemented in the Sonador Web Application ensuring full traceability and compliance with data privacy regulations.
The architecture within Sonador extends Orthanc's Advanced Authorization Plugin to enforce token-based access control across patient, study, and series resources. Authorization is evaluated through the Sonador Web Application's ACL Authorization Engine service, which determines permissions dynamically based on user and group policies.
This decoupled design centralizes security logic while maintaining interoperability with DICOM systems. Each requests carries a validated bearer token ensuring only authorized users or applications can access imaging data. The validation level can be tuned via the Orthanc configuration to balance performance of the platform with the security required by the application. Instance level permission checks are typically exempt from explicit checks to ensure that the system remains performant.

Zero-trust Security
The authorization system within Sonador is an implementation of the Zero-trust security model. Within Zero-trust, no user, device, or system is trustworthy and every request (whether initiated by a human user or an automated service) is identified, authenticated, authorized, and validated against system policies before it will be authorized. Sonador implements four specific components to protect data:
- Identity: the unique representation of a user, service, or device. Within Sonador all interacting software components, including services such as Orthanc and Sonador, are identified and tracked.
- Endpoints: systems which connect to the network or from which functionality is accessed. Endpoints are continuously verified to ensure they meet security and compliance requirements.
- Applications: software systems that access or process data.
- Data: what is ultimately being protected. Within Sonador, data includes medical images and its associated metadata, patient information, and clinical assets.
The Zero-trust foundation within Sonador provides an application level implementation of security policies with server, group, and resource-level permissions to help enforce least-privilege access to API endpoints and data. It also provides an end-to-end identity for all systems integrated into the platform and a centralized view of which data is accessed, by what user/client, and an auditable record which can be used to detect a breach or accidental disclosure.
The authorization engine operates transparently to users. When a surgeon opens a case in the Sonador viewer, when an AI service processes a segmentation, or when a patient accesses their imaging data; the Advanced Authorization Plugin in Orthanc initiates a request to the Authorization Service in the Sonador Web Application to validate the user's permissions. If a policy does not exist, the request is denied.
Authorized users experience smooth, immediate access to the resources they need. Unauthorized attempts are blocked before any data is transmitted, preventing information leakage and maintaining compliance with healthcare regulations like HIPAA.
Sonador's Resource ACL implementation enforces several key zero-trust principles:
- Never trust, always verify. Every request to access a study, view an image, or modify data requires authentication and authorization checks. Even if a user successfully accessed a resource minutes earlier, the next request undergoes the same validation. Sessions can be revoked, permissions can be changed, and the system continuously ensures that access remains appropriate.
- Least privilege access. Users and applications receive only the minimum permissions necessary to accomplish their tasks. A radiologist reading studies doesn't need (and won't receive) permissions to delete data or modify system configuration. Service accounts running automated segmentation have permission to read imaging data and write results, but not to access patient demographics or billing information.
- Microsegmentation. Rather than treating the entire medical imaging platform as a single trust zone, Sonador segments resources at a granular level. Different imaging servers, different studies, and even different series within a study can have independent access controls. This limits the blast radius of any security incident: a compromised account can only access the resources it was explicitly permitted to reach.
- Continuous validation. Endpoints are continuously verified to ensure compliance with security requirements. Access tokens have limited lifespans and must be refreshed. Audit logs track access attempts, creating a record for compliance review and incident investigation.
Authorization Flow
Every request to an imaging server goes through a structured decision process before any data is returned. The following steps illustrate how Sonador and Orthanc coordinate to authenticate the caller and authorize access to the requested resource.
- When an application (whether it be the Sonador Viewer, an integrated AI system, or a connected client application such as 3D Slicer or Blender) requests data from Orthanc, that request is intercepted by the Orthanc Advanced Authorization Plugin.
- The Authorization Plugin parses credentials and determines the resource being requested, what data are related (such as its parent study or patient), and checks its local cache to see if it has recently seen a similar request.
- If authorization to the resource was not granted recently, the Authorization Plugin sends a request to the Sonador Authorization Engine Inrospection Endpoint specifying the resource, URL, and token.
- Sonador parses the request and bearer token to determine the user and associated group membership. If the user is a member of a group associated with the server, permission to access the system is granted. For server level API or ACL mediated endpoints, this provides authorization to the resource.
- For DICOM resource requests, the Authorization Endpoint evaluates the group and user policies to determine if permission for the resource has been granted. If no matching policy (either local or global) can be located, the request is denied and Orthanc responds with a 401 or 403 response to original Orthanc request.

Granting Authorization to a Resource Request
When the Orthanc Advanced Authorization Plugin requests a permission decision from Sonador, the authorization engine evaluates multiple layers of access control policies to determine whether to grant or deny access. This decision process coordinates global policies (managed in the Sonador web application) with local policies (stored in the Orthanc database) to produce a unified authorization decision.
Four policy layers are evaluated:
- Server Permissions (stored as subset of Global Policies permissions) which grant access to "server endpoints" such as file upload and global query/search.
- Group Permissions which grant access to "group owned" resources such as worklists, tags, and distortion filter devices list.
- Global Resource Permissions which use patterns to apply permissions such as
view,modify,remove, oraclto matching resources. Supported patterns might apply to all resources on the server through the use of a wildcard*or to a specific patient, study, or series. - Local Resource Permissions which are attached to a specific patient, study, or series and provide access to the resource (and children) to which they are attached.
Global policies are applied first and Local policies queried next if no global policy is found to match.
Note: the authorization engine queries both the user's direct permissions and all group memberships across all policy layers, applies permission inheritance rules (where parent resource permissions cascade to children and -- in limited cases -- series permissions propagate viewing rights upward to parent studies and patients), and merges all applicable policies using OR logic meaning any single true permission from any layer grants access.

Creating User Roles via ACL Policies
A global policy associated with its group is called a Server Group Permission (or Server Role). It combines server, group, and global resource policies into a functional profile providing access to a set of features within the imaging server. Roles are managed from within the imaging server configuration in the Sonador Administrative Panel.
Each group can hold one role per server, granting API capabilities and data access to users based on their group memberships. As noted above, permissions are additive across groups allowing workflows such as "Dropbox" (upload only), Modality (data sender and verifier), Surgeon (review and reporting), Radiologist (interpretation and reporting), Patient (view and share data), and AI System (analysis and result generation) to have a specific set of capabilities assigned to users within the group. If a specific user needs capabilities beyond what are available within one group, she may be assigned to multiple groups to grant the additional capabilities (since roles have an "additive" effect).
Creating Access Policies
Providing users access to server features is a two step process:
- A global policy (role) for a group needs to be created and attached to a server. The global policy defines the baseline permissions for the group, provides access to the core server API endpoints, and allows for access to ACL mediated endpoints so that users are able to begin working with data .
- The creation of local policies (patient, study, and series) which authorize access to specific resources. Local policies in Sonador set access permissions and create cross relational database links allowing for ACL mediated endpoints to efficiently query authorized resources within the Orthanc database.
These operations can be performed using Sonador's user interface or via the API. If using the user interface, the first step is performed in the Sonador Administrative Panel (available fromhttps://{sonador-url}/admin/ ) and the second from the "Sharing" Dialog withinin the Sonador Viewer. This article focuses on the creation of policies using the user interface. A Jupyter Notebook is available from the Sonador Examples repository which details the process using the API and the Sonador IO Client library.
IMPORTANT: the Sonador 0.4 user interface only allows for creation and management of Global and Study ACL policies. Access to Patient and Series ACL APIs must be done via the Sonador and Orthanc REST APIs. Refer to "API Structure for Managing Access Control Policies" within the Resource Authorization in Sonador for additional information.
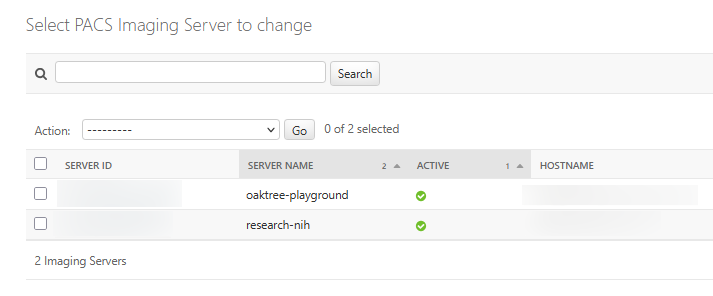
Step 1: Create a baseline global policy (role). Global policies are created from the Imaging Server Configuration panel within the Sonador Administrative Panel available from /admin/pacs/visionaire/pacsimagingserver endpoint of the deployment.
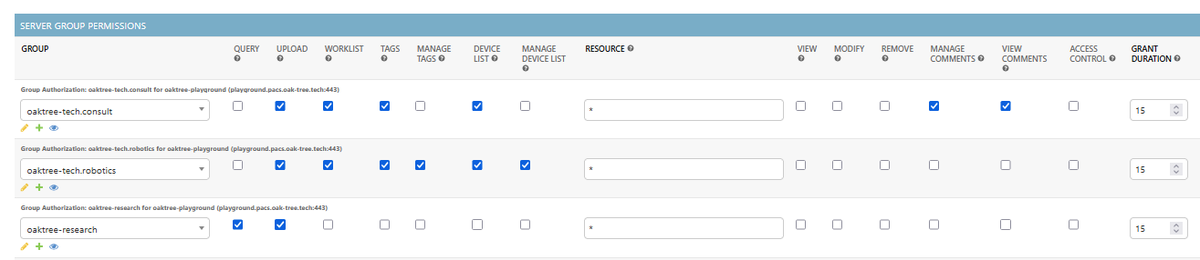
Once the configuration panel for the imaging server loads create a new role by navigating to the "Server Group Permissions" section of the page and clicking the "Add another Group Permission" button.

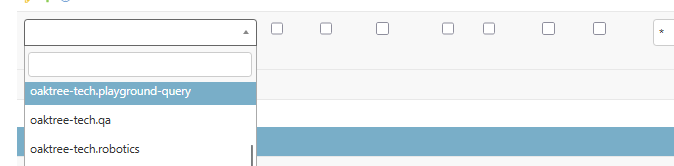
From the dropdown list, select the group for the policy.
Set the permissions for the policy.

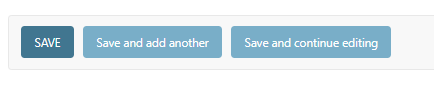
Click on the "Save" button on the bottom of the page to persist the changes to the imaging server configuration.
Step 2: Attach resource specific local policies. Study policies can be attached from the "Share" dialog (accessible by clicking on the "Share" button within the actions menu of the study list or by selecting a study and selecting "Share" in the "Bulk Actions" toolbar at the top of the window).
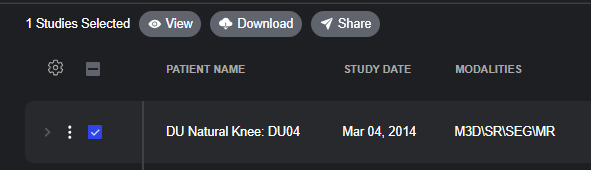
The Share dialog allows for management of both user and group policies.
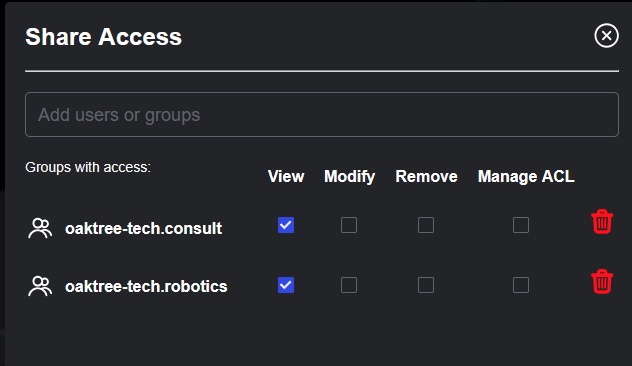
After the dialog opens, locate the user or group for which you are creating the policy by searching for the name, email, or group name.
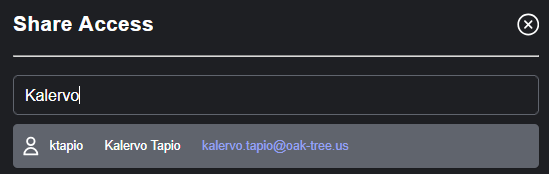
After selecting the user or group, a new line for the policy will become visible. Set the permissions: "View" provides access to retrieve study data (including file data), "Modify" allows access to API endpoints to change or update the study, "Remove" allows for the user to remove the study, and "Manage ACL" allows for the user to create additional policies for other users and groups.

To persist the changes, click "Save".

Recommended Best Practices
When configuring user access to Sonador imaging servers, the most secure approach is to create a "blank" or "empty" server policy that grants users basic access to the server without any global resource permissions. This minimal baseline policy allows users to authenticate and connect to the imaging server while ensuring that all actual data access is governed through explicit Orthanc local policies attached to specific patients, studies, or series.
By requiring explicit authorization at the resource level, organizations implement a true least-privilege security model where users can only view or modify data they have been explicitly granted access to through the "Share Access" dialog or API-based ACL management. This approach provides maximum control, complete auditability of who has access to which resources, and eliminates the risk of unintentional data exposure through overly broad permissions.
To enhance functionality while maintaining security, administrators can selectively add operational permissions to these blank policies based on user roles and workflow requirements. For example, upload permissions enable users to contribute new imaging data to the server; worklist permissions allow participation in structured review and reporting workflows; tags permissions enable qualitative annotation of series during review processes; and device-list permissions support 3D geometry validation for surgical planning applications. For a detailed list of permissions and associated schema, refer to the "API Structure" section of Sonador's ACL Documentation.
IMPORTANT: to be able to access data associated with an imaging server, a user must be a member of at least one role associated with the server.
IMPORTANT: the server query permission should be used sparingly and only for trusted administrative or research roles. It grants unrestricted search access across all data stored on the imaging server regardless of local ACL policies—effectively bypassing resource-level security controls. For most clinical users, omitting the query permission and relying on explicit resource sharing ensures that users only discover and access studies they have legitimate reasons to view, maintaining both HIPAA compliance and organizational data governance standards.
Practical Considerations
Sonador's Resource ACL system attempts to achieve effective data access while also balancing security. Throughout the platform, we've made the following design choices:
- Default deny. Unless explicitly granted permissions, users cannot access resources. This means that even if a user has permission to access to the server, they will not be able to see data unless they have a matching policy (such as a server
querypermission) or a local resource policy authorizing for a specific resource. Refer to "ACL Mediated Endpoints" in the Sonador Documentation for additional information. - Group-based management. The ACL framework uses groups as the primary mechanism for organizing permissions (rather than assigning permissions to individual users), since management of user based permissions becomes unwieldy at scale. Administrators create groups to represent functional roles or organizational units, with users inheriting the combined permissions of all their memberships.
- Inheritance and override. Permissions flow from broader to narrower scopes (server → group → resource), bu more specific rules override general ones. This allows administrators to set baseline permissions broadly while handling exceptions precisely.
- UI Integration. The user interface automatically adapts to show only available actions. If a user doesn't have permission to delete a study, the delete button does not appear. This reduces confusion and prevents frustration from "access denied" errors.
Sample Roles for Preoperative Planning and Interventional Workflows
| Role | Description | Permissions |
|---|---|---|
| Dropbox | Upload data without viewing content | upload |
| Modality | Send imaging data and verify transfer | upload, query |
| Surgeon | Review, comment, report, create worklist items | query, worklist, comments, tags, devices-list |
| Patient | View, download, and share data | Empty role granting access to the server. Local (Orthanc) policy to allow sharing with care teams. |
Sample roles and associated permissions for users within a preoperative planning or interventional workflows.
Access-Aware Workflows in the Sonador Viewer
Access control in Sonador doesn’t stop at the API boundary, the Sonador Viewer applies the same authorization logic to every part of the user interface. Because permissions are enforced at the resource level, the viewer dynamically adapts to the user’s roles, group memberships, and ACL policies; presenting only the studies, tools, and actions each user is authorized to use. This ensures that clinicians, reviewers, engineers, and patients all see a workspace tailored precisely to their responsibilities without accidental exposure to data they shouldn’t access.
Two core features demonstrate this integration: the Shared Studies interface, which provides a curated view of the imaging studies a user has been explicitly granted access to, and role-aware interface elements throughout the viewer, which hide or disable tools based on the user’s permissions.
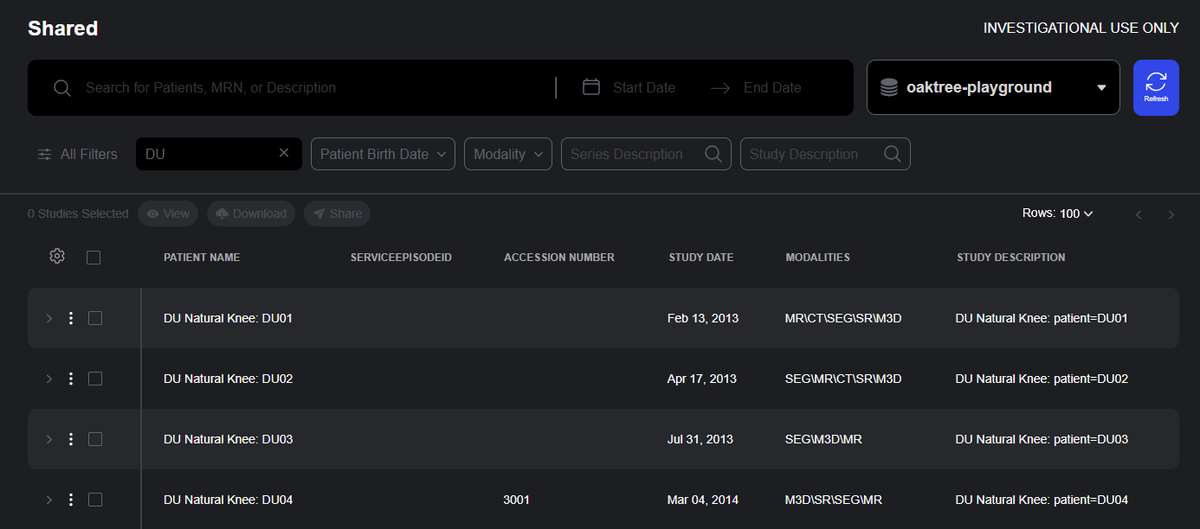
Shared Studies
The Shared Studies interface is the user’s personalized gateway into the imaging data they’ve been authorized to access. Instead of displaying all studies stored on an imaging server, which might risk exposing sensitive data, the page shows only the studies that the user has been explicitly been authorized to access.
This filtered view is computed dynamically at login: the authorization engine evaluates the user’s group memberships and the ACLs associated with each patient, study, or series to determine exactly which resources should be visible. The result is a clean, focused workspace where users see the cases relevant to their tasks, while administrators have confidence that patient privacy is being preserved.
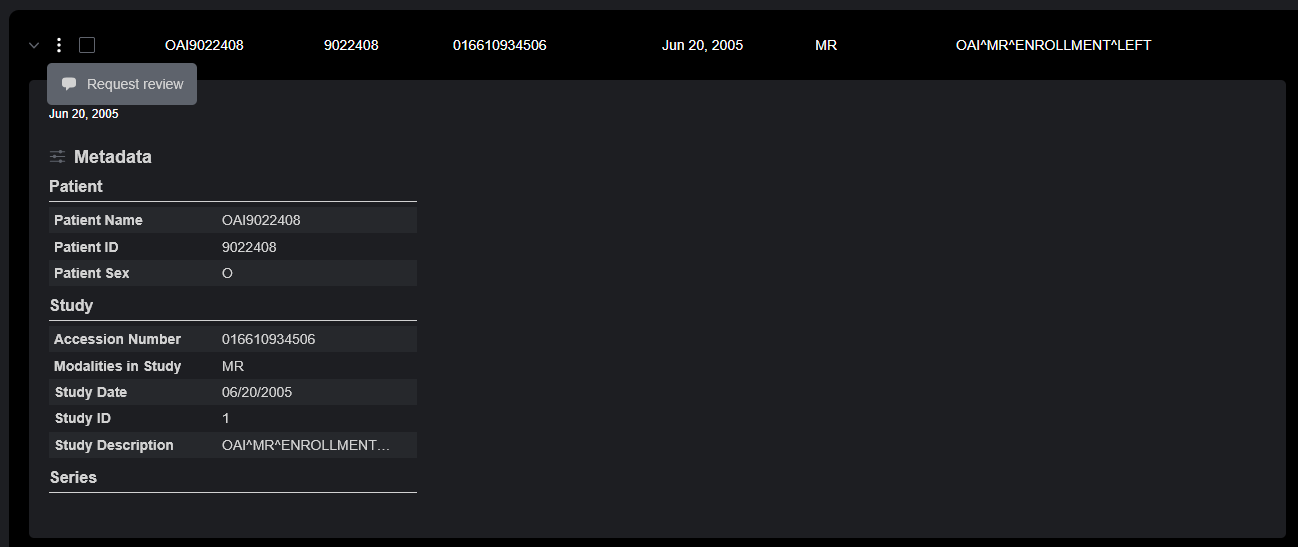
Permission-Responsive Tools and Workflows

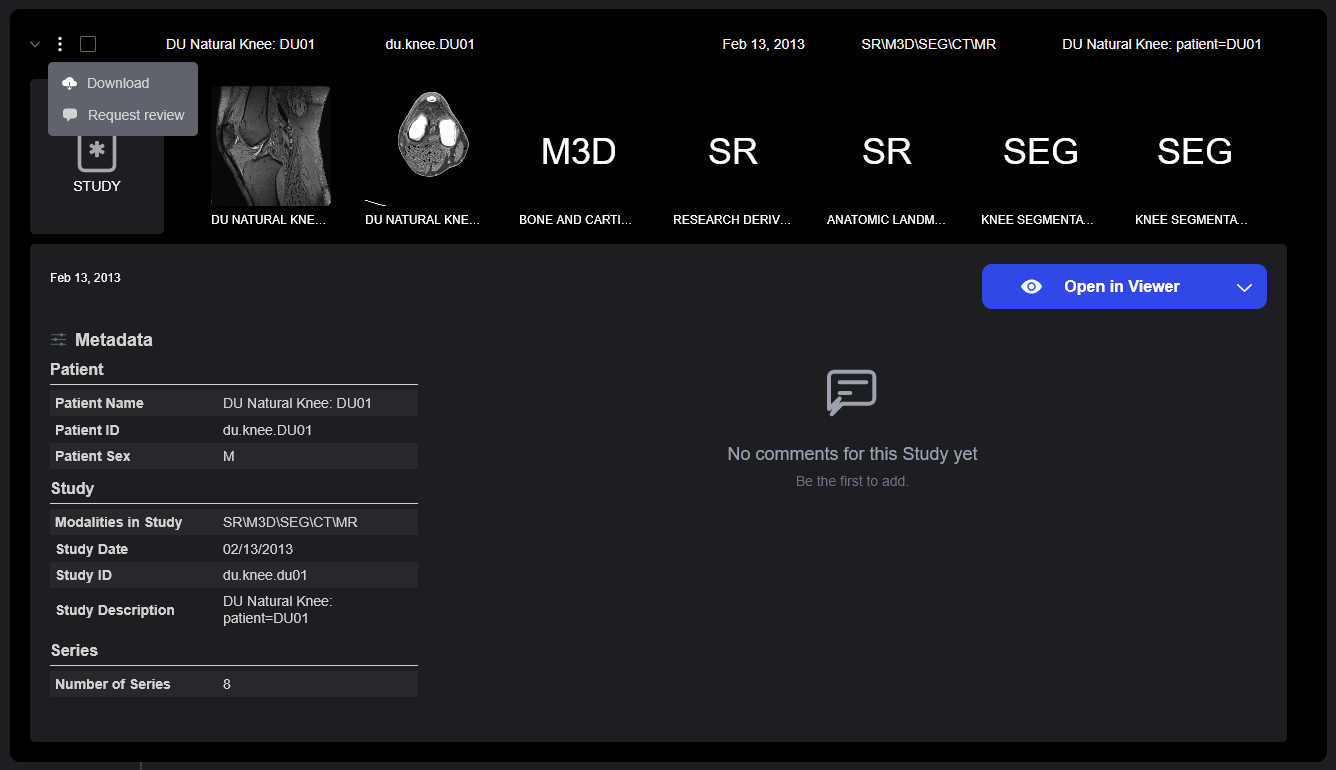
The Study Details drawer also takes permissions into account. Only elements for which the user has an explicit permission will be displayed.
The study in the top image has a View permission, but lacks CommentView or CommentEdit permissions. The user in the second image has a query permission (providing access to basic metadata), but is not authorized to access any other information.
ACL Integration with Upstream Identity Providers
Resource ACL updates in Sonador version 0.4 extend the platform's support for remote identity providers to provide additional authentication capabilities and better support for user and group management. Sonador has always supported user authentication using OpenID connect, which allows for access to the platform via login from an external Identity Provider such as Okta, Keycloak, Microsoft Entra ID (formally Azure AD), or Amazon Cognito; When a remote user is authenticated, Sonador creates or updates an internal user record linked to that provider. This local identity anchors the authorization system, establishes the user's unique UID, associates the account with local groups which determine ACL policies and data access.
Within Sonador 0.4, the integration goes further. "Identity Service Providers" (the Sonador Web Application component which interacts with remote IdPs) are now able to synchronize group membership directly from upstream identity providers validate tokens issue outside of Sonador. This allows external applications, native clients, and third-party systems to participate in the a unified identity model across the entirety of an enterprise organization.
These capabilities are powered by two new provider-level methods (which can be enabled on a per-service basis through authentication server configuration):
- Sync User Data from IdP which provides a hook to update the user configuration after an account has been authenticated or a remote token is validated.
- Validate Token for User which provides logic to parse IdP issued tokens and verify that they are valid through remote API call or local cryptographic inspection.
This remote synchronization closes the loop between remote IdP authentication and authorization. Changes to group assignments or roles in the upstream IdP propagate automatically into Sonador, ensuring that users always operate under current permissions. Likewise, remote token validation allows Sonador to rely on externally issued access tokens while still enforcing all ACL policies and zero-trust guarantees.
To preserve performance and reduce external calls, Sonador 0.4 also introduces a "Credentials Cache" to store short-lived remote token validation results. This cache alows secure remote verification without impacting responsiveness, even when relying on external systems for every request.
The remainder of this section looks at these capabilities in detail, including a walk-through of their configuration and demonstration of how to enable remote token verification for AWS Cognito demonstrating how group synchronization and remote validation can be enabled for a cloud deployment.
How Identity Providers Facilitate Resource Authorization
Sonador's identity integration has a clean separation between Identity Providers (the reusable logic for interacting with external system) and Authentication Servers (the instance-level configuration that binds a specific deployment to that provider).
- Identity Providers define how Sonador communicates with a class of external IdPs: how to build service URLs, exchange OIDC codes for tokens, retrieve profile attributes, and now (with Sonador 0.4) how to synchronize groups and validate remotely issued tokens. providers remain service-aware templates; they do not contain deployment-specific credentials, URLs, or mapping rules.
- Authentication Servers supply those deployment details. Each server specifies the issuer URL, client credentials, redirect URIs, and whether features such as remote token validation or group synchronization are enabled. When a user signs in or presents a remote access token, the authentication server delegates all IdP-specific logic to its associated provider (including group mapping and user role management) while Sonador performs final ACL evaluation.
To enable access to remote token validation and group synchronization provider specific logic must be enabled for Sync User Data from IdP and Validate Token for User, attributes defined for the instance allowing it to retrieve/parse JWT tokens, and the "Validation of IDP tokens" option enabled on the Authentication Server instance associated with the provider. The following walk-through demonstrates the process for an already configured AWS Cognito instance.
Note: For additional detail on how the interaction between Identity Providers and Authentication Servers works, refer to Managing Users and Access in Sonador. The remote validation instructions build on the sample Cognito IdP configuration in the same article.
Step 1: Implement Logic for Data Sync and Token Validation
Before Sonador can perform remote group synchronization or validate externally issued tokens, the Identity Provider instance associated with your authentication workflow must implement Sync User Data from IdP and Validate Token for User. These functions allow Sonador to retrieve user attributes from an upstream IdP and cryptographically verify access tokens that originate outside the Sonador login flow.
To configure these methods, open the Sonador Administrative Panel and navigate to:
Administration → Identity Provider (Authentication/Authorization) Management → OpenID Connect (oAuth2) Identity Providers → (Select Your Provider Instance)
Take note of three fields: "General Service Configuration", "Sync User Data from IdP", and "Validate Token for Users." These fields accept configuration and Python logic to extend the provider's behavior. Reference implementations are provided for Cognito below.
General Service Configuration
Before adding the logic for "Sync User Data from IdP" and "Validate Token for Users," ensure that the "General Service COnfiguration" includes the id_ specific values required to retriev and validate JWKS signing keys. These values are used in the implmentation logic and must be defined using the keys below.
grant_type: authorization_code
signing_key_url: "https://{cognito-instance}/{region}/.well-known/jwks.json"
supported_algorithms:
  - RS256
The value of signing_key_url will be associated your Cognito intance and must be
retreived from the Cognito administrative panel.
Sync User Data from IdP
Locate the "Sync User Data from IdP" field and add the logic from the listing below which updates the local Sonador user record to match attributes and group assignments from the external IdP.
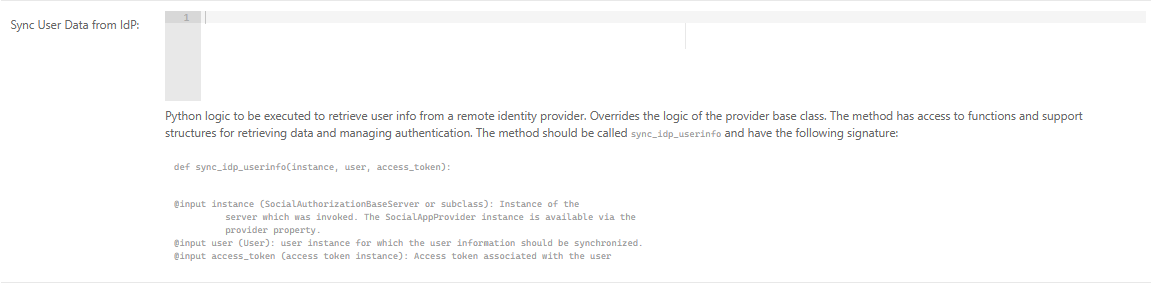
sync_idp_usernfo Python implementation:
def sync_idp_userinfo(instance, user, access_token):
    """ Takes a token and sync the Django usermodel groups to the sonador ones.
    """
    # Parse JWT data to dict. Data is verified cryptographically by validate token
    # and via OIDC for other login flows.
    _data = jwt2data(access_token.access_token)

    if _data.payload.get('username') and not user.username != _data.payload.get('username'):
        user.username = _data.payload.get('username')

    if _data.payload.get('given_name'):
        _parts = _data.payload.get('given_name', '').split(' ')
        user.first_name = ' '.join(_parts[0:-1])
        user.last_name = ' '.join(_parts[-1:])

    if _data.payload.get('email'):
        user.email = _data.payload.get('email')

    # Deocde data from token
    cognito_groups = _data.payload.get("cognito:groups", [])


    if cognito_groups:

        # Existing groups in Sonador
        user_groups = []

        for g in user.groups.all():
            user_groups.append(g.name)

        # Add user to groups they aren't in
        for _name in cognito_groups:
            if _name not in user_groups:
                added_group, created = Group.objects.get_or_create(name=_name)
                added_group.user_set.add(user)

        # Remove local groups not specified by the remote server
        for _g in set(g.name for g in user.groups.all()).difference(set(cognito_groups)):
            try:
                g = instance.group_class.objects.get(name=_g)
                user.groups.remove(g)
            except instance.group_class.DoesNotExist:
                pass

    user.save()
Notes:
- JWT Parsing:
sync_idp_userinfousesjwt2data(provided by by the Python JWT package) to extract payload attributes from the access token. At this point in Sonador's authorization flow, the token as already been cryptographically validated either during OIDC login or via
"Validate Token for User" (validate_token) or "Retrieve Authorization Token". - User Attribute Updates: If the upstream IdP provides
username,given_name, oremailthese fields are propagated into the Sonador user record. - Group Synchronization: Cognito includes group membership in the
cognito:groupsclaim. The method:- Collects all current Sonador groups for the user.
- Adds the user to any groups present in the token but not locally.
- Removes groups that no longer in the IdP response.
This ensures that Sonador's ACL decisions always reflect the authoritative identity system without manual intervention or duplicate gorup definitions.
Validate Token for User
Next, locate the "Validate Token for User" field and add the code in the listing. The Cognito implementation below performs cryptographic validation of the Cognito token, ensure that it was issued by the expected IdP using the IdP signing key (specified via the signing_key_url in the General Service Configuration), ensures that supported algorithms are used, and retrieves expiration details.
validate_token Python implementation:
def validate_token(instance, access_token):
    ''' Validate token instance with AWS Cognito
    '''
    success = False

    # Verify token was issued was Cognito instance
    signing_key_url = instance.provider.service_configuration_json.get('signing_key_url')
    if not signing_key_url:
        raise ConfigurationError(
        'Unable to validate token, no signing key included in configuration.')

    # Ensure support signing keys provided
    _alg = instance.provider.service_configuration_json.get('supported_algorithms')
    if not _alg:
        raise ConfigurationError(
            'Unable to validate token, no supported algorithms provided in configuration.')

    # Decode token to retrieve header and signing algorithm
    _jwks = jwt.PyJWKClient(signing_key_url)
    signing_key = _jwks.get_signing_key_from_jwt(access_token.access_token)

    # Verify token
    validated_token = jwt.decode(access_token.access_token, signing_key.key, algorithms=_alg)
    if validated_token.get('username'):
        success = True

    _data = jwt2data(access_token.access_token)
    exp = _data.payload.get("exp")
    if not exp:
        raise ConfigurationError('Invalid expiration value=%s"%s"' % exp)

    # Tell get_user method to retrieve data from token instance
    setattr(instance, 'parse_token_userdata', True)

    return success, exp if (success and exp) else 0
Notes:
- Key Retrieval: the method reads the
signing_key_urland downloads the JWKS keyset published by upstream Cognito IdP. - Algorithm Validation: the method ensures that the algorithm from Cognito
matches those explicitly declared in the
supported_algorithsmkey of the provider configuration. - Signature Validation: the token's signature is validated using the public key from the JWKS endpoint, ensuring crytographic integrity and confirming that the token was issued by the trusted IdP.
- Expiration Handling: the
expclaim is extracted and returned so Sonador is able to enforce lifetime policies.
Putting It Together
With the provider-specific logic in place and the required values added to the General Service Configuration, the Identity Provider is now able to:
- parse and validate remote JWTs
- extract user attributes and group memberships
- synchronize those attributes into Sonador's internal user model
- participate in a unified identity model across the entire entrerprise
Step 2: Enable Remote Token Validation on the Authentication Server
Once the identity Provider instance has support for data synchronization and token validation, the final step is to enable those capabilities on the Authentication server that binds your deployment to the provider. The Authentication Server controls how users authenticate, how tokens are interpreted, and whether Sonador should trust tokens outside of its internally issued standing tokens or session tokens.
To configure Remote Token Validation, open the Sonador Administrative Panel and Navigate to:
Administration → Authentication and Authorization → Authentication Servers → (Select Your Server Instance)
Locate the "Validation of IdP Tokens" field in the configuration and ensure that the option is "Enabled." This option instructs Sonador to accept access tokens obtained directly from the upstream Identity Provider and to evaluate them using the provider logic implemented in Step 1.

When the setting is turned on:
- Incoming tokens are passed to the provider's Validate Token for User method for cryptographic validation.
- If validation succeeds, Sonador derives identity attributes from the token.
- The validate user identity is processed normally through Sonador's Resource ACL framework.
If the setting is not enabled, only internally issued tokens are processed by the platform. Configuration notes:
- The Authentication Server must be associated with the Identity Provider instance updated in Step 1.
- The provider's General Service Configuration must include the required fields
signing_key_urlandsupported_algorithmsprior to enabling token validation. - Remote validation should only be enabled for providers that publish JWKS keysets and follow modern OIDC/JWT conventions. The instructions published in this guide have been verified using AWS Cognito. Guides for Microsoft and Google IdP instances will be published in the future.
Once the configuration is enabled and saved, Sonador will begin evaluating external tokens using the logic implemented in your Identity Provider.
Conclusion
Resource Access Control Lists are not merely a technical feature—they are the practical implementation of zero-trust security principles in a clinical environment where patient safety and data privacy are paramount. Sonador's ACL framework demonstrates how sophisticated access controls can be deployed transparently, enabling complex multi-stage workflows like 3D preoperative planning while maintaining strict security boundaries.
By integrating authentication and fine-grained authorization into a unified security architecture, Sonador provides healthcare organizations the tools they need to protect sensitive medical data without impeding clinical care. Every request is verified and every action is authorized providing a modern security posture that meets regulatory requirements while supporting the demanding workflows of modern medical imaging.
For organizations implementing or evaluating medical imaging platforms, the lesson is clear: security cannot be an afterthought or a checkbox feature. It must be woven into every component of the system, from initial authentication through resource access to final audit. Sonador's Resource ACL implementation provides a roadmap for achieving this integration, demonstrating that robust security and seamless user experience are not opposing goals but complementary requirements for effective healthcare technology.
Documentation
- Why Zero-Trust Security is Essential: a Real-World Lesson for Business. Zero-trust security constantly validates access in today's perimeter-less digital landscape, crucial for reputation, finances, and operational continuity for businesses.
- Managing Users and Access in Sonador. User identity management and access control are essential to ensuring data security. Sonador uses OpenID connect and oAuth2 to provide access to imaging resources. This article describes how those systems are implemented and walks through the process of enabling security and configuring Single Sign On.
- Sonador Authentication Credentials. Sonador documentation page describing credentials in the platform, token types, interactions with the user model and how they can be managed via the platform's API.
- Resource Authorization. Sonador Documentation page describing the Resource ACL API, permission types, and platform endpoints.
- Orthanc Advanced Authorization Plugin. Orthanc documentation page describing the Orthanc Authorization Plugin, integration specification, and configuration options.
Comments
Loading
No results found